


As anyone who has used an X2 minimill knows, y-axis travel is very limited. I converted a minimill to cnc a few years back and have been constantly plagued by the lack of y-axis travel. Push came to shove when I wanted to use it to machine parts for a gantry router I have under construction so I finally decided to do something about it.
On his website, Hoss lists a couple of mods to the y-axis to extend it around .75" in one direction and around 1.5" in the other. Unfortunately, the latter allows the saddle to over travel the ways by an excessive amount. This thread describes how I solved that problem by extending the y-axis ways.
I began by hogging out the throat of the minimill base. This modification encompasses Hoss's modification and the modification which can be found in the Y! minimill group. This modification necessitates relocating the column mount to the back of the mill base. Shown in the first few images are the throat clearance and the initial milling of the flats for the new column mount.
Thread: X2 Y Axis Way Extension
Results 1 to 20 of 278
-
03-05-2010, 08:06 AM #1
 Registered
- Join Date
- Feb 2004
- Posts
- 313
X2 Y Axis Way Extension
~Don
-
03-05-2010, 08:10 AM #2
Registered
- Join Date
- Feb 2004
- Posts
- 313
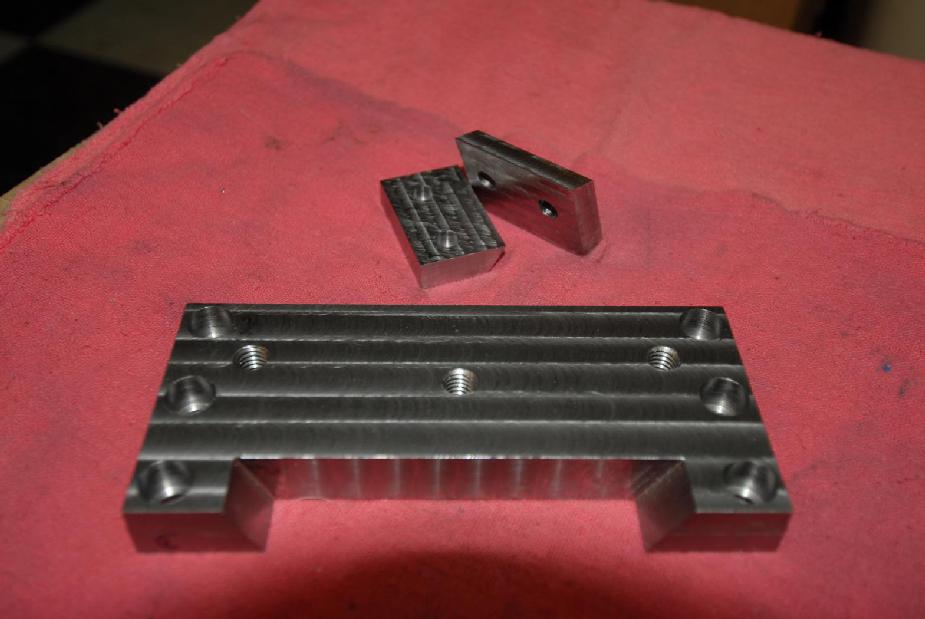
Next, holes are drilled and tapped for mounting the column mounting plate as well as holes for mounting the y-axis way extensions. I used 5/16" bolts for the column mount and 10-32 bolts for the way extensions.
~Don
-
03-05-2010, 08:21 AM #3
Registered
- Join Date
- Feb 2004
- Posts
- 313
Next, I fabricated the new column mount out of 3/4" mild steel. All holes are drilled and tapped and a test fit is performed on the minimill base.
~Don
-
03-05-2010, 08:26 AM #4
Registered
- Join Date
- Feb 2004
- Posts
- 313
I skipped a few steps and didn't take any photos during the process but I recut the base where the extensions will mount - mainly to square up the ends of the existing ways. Then I cut the way extension blanks out of 1/2" mild steel and rough fit them to the base assembly.
~Don
-
03-05-2010, 09:25 AM #5
Registered
- Join Date
- Feb 2004
- Posts
- 313
Next, I cut the 60 degree dovetails in the way extensions. The extensions are left slightly oversized for fine fitting. The material removal here is to take the load off of the dovetail cutter.
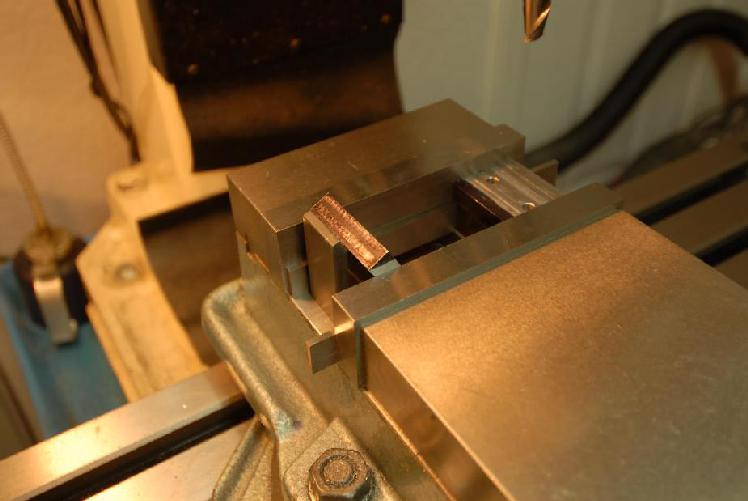

Trimmed and ready for installation.
 ~Don
~Don
-
03-05-2010, 10:35 AM #6
Registered
- Join Date
- Feb 2004
- Posts
- 313
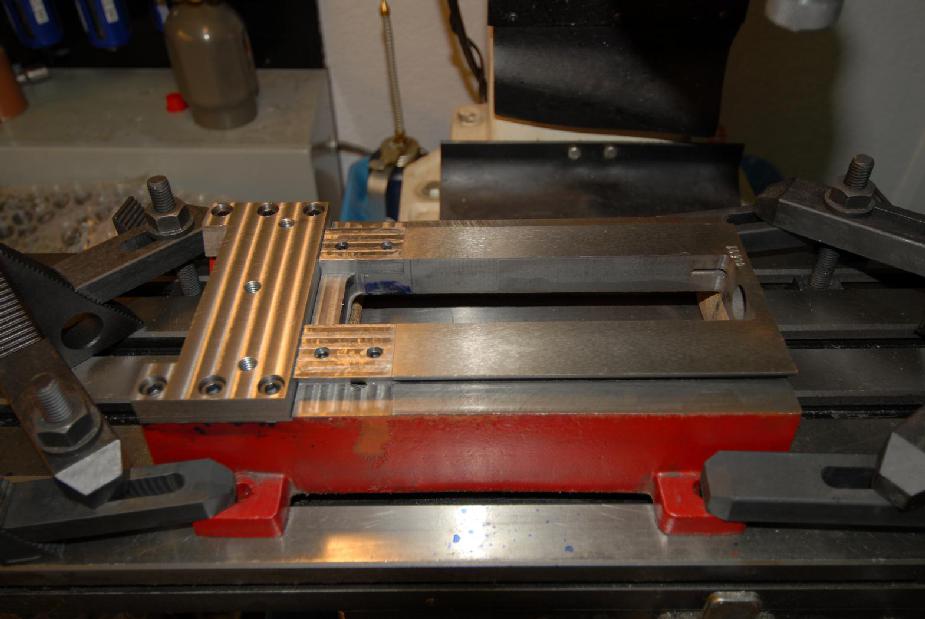
Here's an image of the base just prior to being put back on the table for final installation.
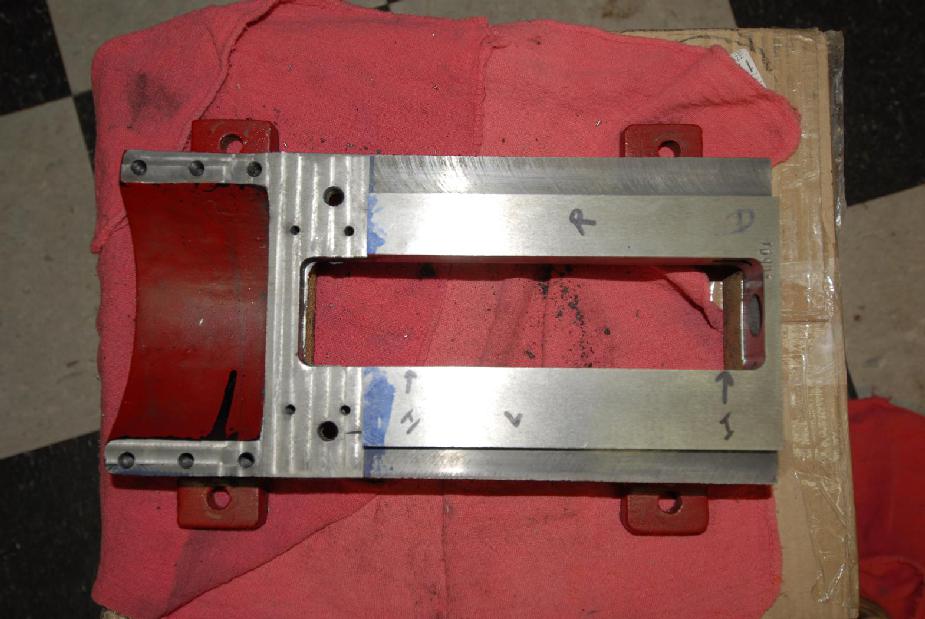
Here I'm using a very clean edge to indicate the base. That edge was cut during the hogging out of the base throat.
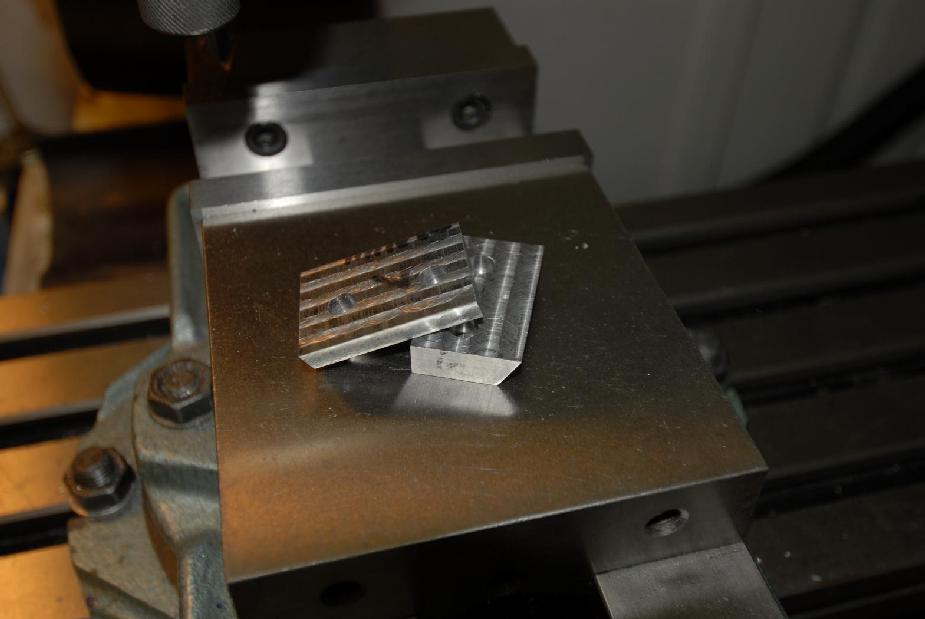
Here are the goodies to be installed.
The base is secured to the table and the parts are installed. The way extensions have been secured with 10-32 socket bolts and a very thin film of JB Weld. I let the epoxy cure for 24 hours prior to final machining.
 ~Don
~Don
-
03-05-2010, 10:42 AM #7
Registered
- Join Date
- Feb 2004
- Posts
- 313
Finally!!!!
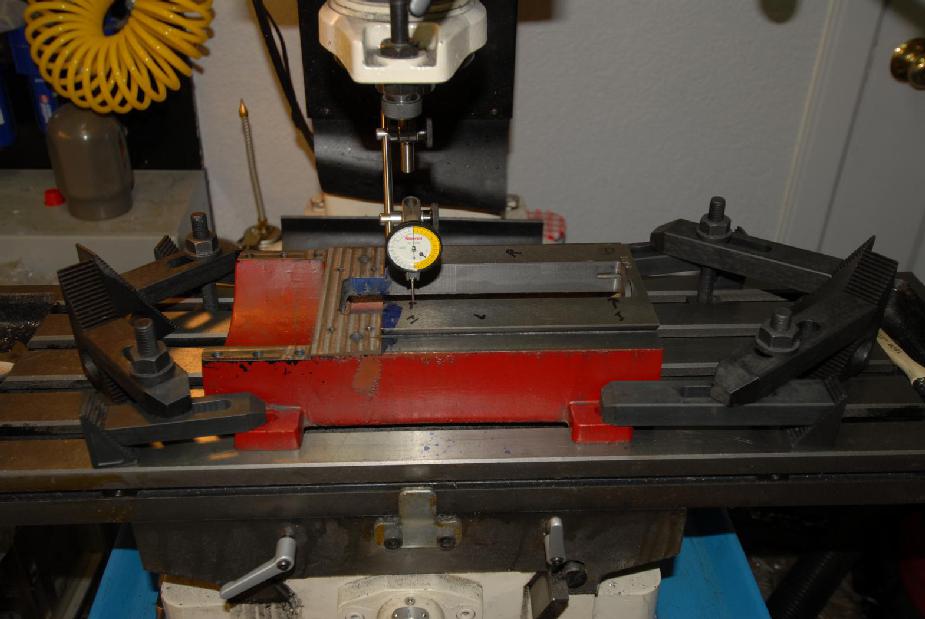
The dovetails were cut with a 60 degree dovetail cutter. To bring everything flush, I removed about .015 from the base of the dovetail, .018 from the left hand dovetail and .023 from the right hand dovetail. The top of the ways was surfaced with a flycutter. This was all done in a single set up to ensure everything is parallel and in the same plane.
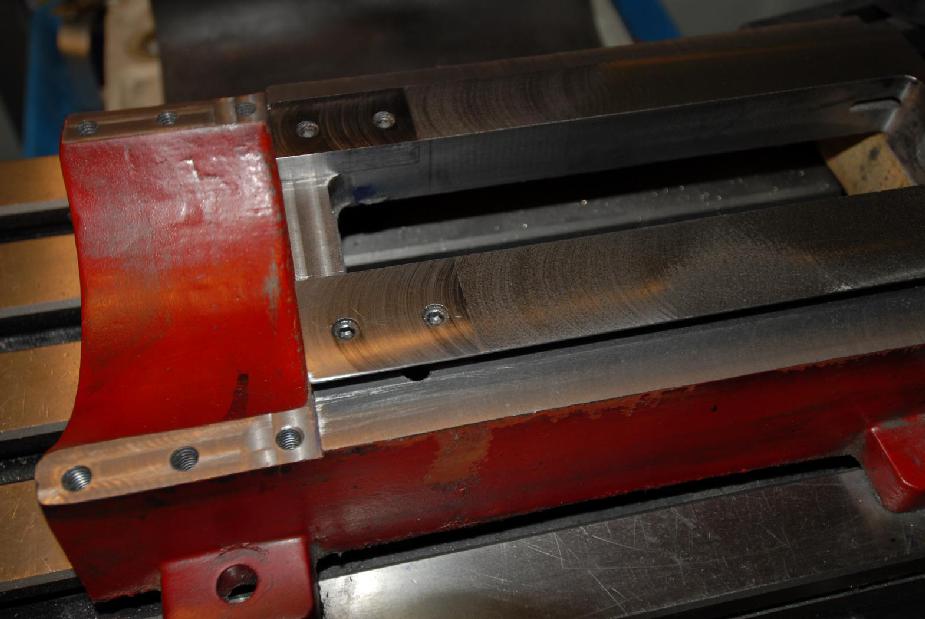
That's all for now. Next up will be cutting the dovetails in the saddle and X2 table. Then on to lapping and polishing of the ways.~Don
-
03-05-2010, 04:44 PM #8
Registered
- Join Date
- Sep 2009
- Posts
- 55
Nice. Looking forward to more updates.
-
03-05-2010, 05:54 PM #9
Registered
- Join Date
- Oct 2007
- Posts
- 155
Very cool. How much travel travel will you get on Y?
-
03-05-2010, 08:27 PM #10
Registered
- Join Date
- Feb 2004
- Posts
- 313
With no over travel of the ways, I'll get 5.625" of travel. If I over travel toward the stepper mount, I can get a little better than 6". Considering I started with around 3.5" (the chip guards were getting in the way), this represents a HUGE improvement and makes the machine so much more useful. To utilize this increased travel, I'll need to machine a spacer for the spindle to z-axis mount.
I have tons of other mods planned for my X2 while it's in pieces including a counter balance, limit switches, new spindle bearings and some sort of column brace.~Don
-
03-06-2010, 12:04 AM #11
Member
- Join Date
- Feb 2010
- Posts
- 0
Great work! I would probably have had to order a new base for mine if I tried that!

-
03-06-2010, 12:36 AM #12
Registered
- Join Date
- Oct 2007
- Posts
- 155
I'm waiting for the Large Table Assembly from LM, http://www.littlemachineshop.com/pro...ory=-269978449
Once I have that in house I might try something like this to extend travel even further, if the larger base allows it.
-
03-06-2010, 01:15 AM #13
Registered
- Join Date
- Feb 2004
- Posts
- 313
Thanks! Originally Posted by knudsen


Trust me, I had sweaty palms during some of this and I'm glad I'm on the other side of it. I took lots of time to get this done and there was a lot of scratching of the backside during the process. The rest of the upgrade is pretty simple by comparison.~Don
-
03-06-2010, 01:23 AM #14
Registered
- Join Date
- Feb 2004
- Posts
- 313
I had considered that as well as the base from the "monster X2" conversion elsewhere on this site. Both costs $$$ and right now that's not a good thing. Aside from tooling this conversion came from the material stockpile - cheap! I like that. Plus the monster conversion doubles the footprint of the mill and wouldn't fit on the bench I'm using. Originally Posted by ellik
A 6" y-axis work envelope will breathe new life into this mill.
You should be able to do something similar with the long X2 base. That would be sweet!~Don
-
03-06-2010, 03:38 PM #15
Registered
- Join Date
- Feb 2007
- Posts
- 127
 NO SWEAT!!! HF has the bases for like 19.00 each, I ordered 2 of them for a total of $48.00 shipped. Originally Posted by degreaser
Robert
-
03-06-2010, 06:22 PM #16
Banned
- Join Date
- Mar 2009
- Posts
- 1114
I did the same thing but mine had to come from China. Took 6months until I got it.
I totally forgot about it by the time it showed up. I had other projects to keep me busy.
-
03-06-2010, 07:41 PM #17
Member
- Join Date
- Apr 2006
- Posts
- 8159
Excellent work! you made the list.
http://www.hossmachine.info/X2_Travel_Increases.html
Hosshttp://www.hossmachine.info - Gosh, you've... really got some nice toys here. - Roy Batty -- http://www.g0704.com - http://www.bf20.com - http://www.g0602.com
-
03-06-2010, 07:50 PM #18
Registered
- Join Date
- Aug 2009
- Posts
- 986
Well done!
I'd been planning to do something very similar to my X2 mill. When I recut the dovetails, I did the necessary cuts on the base so I could add extensions and move the column back, much like you did.
But you definitely beat me to the finish. Congratulations.
Fred
-
03-07-2010, 04:06 AM #19
Registered
- Join Date
- Feb 2007
- Posts
- 127
Got mine in about a week.....they may stock them now?
Robert
-
03-07-2010, 11:34 PM #20
Registered
- Join Date
- Feb 2004
- Posts
- 313
Thanks! I'm honored Originally Posted by hoss2006
I'm just glad to have been able to give back to the community.
BTW - The cost would be about $10 for materials, $10 for socket head screws and $5 for JB Weld. $25 to $50 for tooling.
I figure I'll get another 0.5" on the Z axis as well.~Don

 Reply With Quote
Similar Threads
-
What is a M3P extension
By bill south in forum Mach Wizards, Macros, & AddonsReplies: 5Last Post: 12-10-2014, 08:39 AM -
How much to cut for y axis extension?
By kimoyo in forum Charter Oak Automation Support ForumReplies: 1Last Post: 06-25-2009, 08:50 PM -
X2 Y-axis extension
By X2cnc in forum Benchtop MachinesReplies: 34Last Post: 12-17-2008, 04:14 AM -
File Extension Question
By TZ250 in forum MilltronicsReplies: 10Last Post: 08-06-2007, 02:55 AM -
Extension Cord
By dneisler in forum Welding Brazing Soldering SealingReplies: 4Last Post: 01-14-2006, 02:29 AM
