


Place ball screw drive onto the carriage.
Thread: A Desktop CNC by David A
Results 41 to 60 of 70
-
05-10-2024, 11:48 PM #41
 Registered
- Join Date
- Oct 2009
- Posts
- 798
Re: A Desktop CNC by David A
-
05-10-2024, 11:54 PM #42
Registered
- Join Date
- Oct 2009
- Posts
- 798
Re: A Desktop CNC by David A
Installed drive.
Attachment 505376
-
05-10-2024, 11:56 PM #43
Registered
- Join Date
- Oct 2009
- Posts
- 798
Re: A Desktop CNC by David A
Install brace bracket.
-
05-11-2024, 12:00 AM #44
Registered
- Join Date
- Oct 2009
- Posts
- 798
Re: A Desktop CNC by David A
Install first brace.
-
05-11-2024, 12:02 AM #45
Registered
- Join Date
- Oct 2009
- Posts
- 798
Re: A Desktop CNC by David A
And the second one.
-
05-11-2024, 12:05 AM #46
 Member
- Join Date
- Jul 2018
- Posts
- 6455
Re: A Desktop CNC by David A
Hi David - Can you give a brief description of how you do your imaging? I'ts always impressed me.. . Peter
-
05-11-2024, 12:21 AM #47
Registered
- Join Date
- Oct 2009
- Posts
- 798
Re: A Desktop CNC by David A
I have a set of 23 sized ClearPath servos so I will use them.
For steppers, you can use larger pulleys for higher speeds.
Servo installed.
Attachment 505390
-
05-11-2024, 12:36 AM #48
Registered
- Join Date
- Oct 2009
- Posts
- 798
Re: A Desktop CNC by David A
Hi Peter, I use an app called Pixelmator Pro for the graphics but you can do the same with Photoshop as well.
In a nut shell, you create different layers which are stacked on top of each other.
Let's say you paint the bottom layer yellow. Then on the layer on top of it, you cut out the areas where you want the yellow to show through. Then you put a new layer on top of the second layer and select areas you want to put on a different color. And then you adjust the opacity of each layer to get the effect you want. On some images, you have tens of layers with all their own adjustments and it can become very tedious very fast.
It's very different from a CAD program as they are pixel based and not vector. When you enlarge enough a pixel based image, you will be able to see the actual pixels, contrary to a CAD software where a line is always a line no matter how much you enlarge it. And there is always, forever something more to learn with Pixelmator and Photoshop.
-
05-11-2024, 06:39 AM #49
Member
- Join Date
- Jul 2018
- Posts
- 6455
Re: A Desktop CNC by David A
Hi David - Thanks I have a look at Pixelmater don't have photoshop or anything like that. Peter
-
05-11-2024, 08:07 AM #50
Member
- Join Date
- Jul 2018
- Posts
- 6455
Re: A Desktop CNC by David A
Arrggg its for a Mac!

-
05-11-2024, 01:42 PM #51
Registered
- Join Date
- Oct 2009
- Posts
- 798
Re: A Desktop CNC by David A
Oh, I didn't realize that. You buy the Pixelmator and you own it. With Photoshop, you pay a subscription forever. But I think there is a basic version of Photoshop you can buy.
-
05-15-2024, 12:21 AM #52
Registered
- Join Date
- Oct 2009
- Posts
- 798
Re: A Desktop CNC by David A
Install linear rails on the gantry beam.
Attachment 505544
-
05-15-2024, 12:37 AM #53
Registered
- Join Date
- Oct 2009
- Posts
- 798
Re: A Desktop CNC by David A
.
The X/Z Carriage
Linear rails: 2 x 1.18 diameter (30mm) stainless steel round rails
Space between spindle and face of gantry: 0.85"
Motor size: Nema 23
Lead: 4mm per revolution
Speed: Up to 157 inch/minute @ 1,000 RPM
Dynamic/static rating: about 600lbs/1,000lbs
Max. speed: 3,000 RPM
Some time ago, concept for the X/Z carriage was published.
Attachment 505546
-
05-15-2024, 12:40 AM #54
Registered
- Join Date
- Oct 2009
- Posts
- 798
Re: A Desktop CNC by David A
This is the physical build.
Colors to match concept
Attachment 505548
And without colors.
-
05-15-2024, 12:41 AM #55
Registered
- Join Date
- Oct 2009
- Posts
- 798
Re: A Desktop CNC by David A
The back side.
-
05-15-2024, 12:42 AM #56
Registered
- Join Date
- Oct 2009
- Posts
- 798
Re: A Desktop CNC by David A
And the stepper/servo mount installed.
-
05-16-2024, 10:24 PM #57
Registered
- Join Date
- Oct 2009
- Posts
- 798
Re: A Desktop CNC by David A
Spindle installed.
A water cooled spindle in this case with plumbing/wiring guide.
Attachment 505610
-
05-16-2024, 10:26 PM #58
Registered
- Join Date
- Oct 2009
- Posts
- 798
Re: A Desktop CNC by David A
Standard lighting and Loc-Line.
-
05-16-2024, 10:41 PM #59
Registered
- Join Date
- Oct 2009
- Posts
- 798
Re: A Desktop CNC by David A
Ready for installation onto the 3060 gantry beam.
Note that the spindle back is just 0.85" in front of the gantry beam face.
-
05-19-2024, 03:13 PM #60
Registered
- Join Date
- Oct 2009
- Posts
- 798
Re: A Desktop CNC by David A
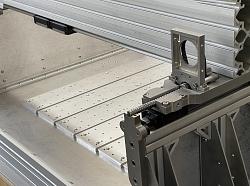
X/Z carriage on the gantry beam with the servo installed.
Attachment 505694
Attachment 505696

 Reply With Quote
Similar Threads
-
David A's Benchtop CNC Version 2
By davida1234 in forum DIY CNC Router Table MachinesReplies: 102Last Post: 09-09-2021, 02:08 PM -
Prolight-1000 Desktop CNC Mill and Prolight-3000 Desktop CNC Lathe
By Seanster in forum For Sale OnlyReplies: 0Last Post: 06-06-2018, 01:50 PM -
KL-6090 Desktop Cnc Router desktop,(24 x 36 x 6 inch)
By automationtechinc in forum For Sale OnlyReplies: 2Last Post: 09-18-2015, 09:05 PM -
KL-6090 Desktop Cnc Router desktop,(24 x 36 x 6 inch)
By automationtechinc in forum News AnnouncementsReplies: 0Last Post: 04-28-2015, 11:23 AM -
DIY David Steel CNC
By Wineryrjd in forum DIY CNC Router Table MachinesReplies: 2Last Post: 03-28-2010, 01:39 PM
