


If I had to guess, I'd say odds are they are Canada or China. I could be wrong. Maybe John or someone will see and answer this correctly.
Thread: Rong Fu RF30 Conversion
Results 61 to 80 of 106
-
11-30-2013, 03:34 PM #61
 Gold Member
- Join Date
- Jun 2004
- Posts
- 6618
Lee
-
11-30-2013, 04:09 PM #62
Company Representative

- Join Date
- Aug 2008
- Posts
- 400
For the most part, we use the WeiPu brand connectors and stock spare parts for our machines. We don't advertise or promote our connectors for public sale, however, if someone has a specific need for more information, you can contact [email protected]. We would be more than happy to assist where we can.
Regards,
Novakon Team
-
12-01-2013, 09:58 AM #63
Registered


- Join Date
- Mar 2007
- Posts
- 304
Thanks Novakon Team!
www.CNC-Joe.com
CNC Is Not Just My Passion.. It's My Addiction !!!!
-
12-04-2013, 11:04 PM #64
Registered
- Join Date
- Dec 2006
- Posts
- 73
Had the creeping crud which kept me out of the shop for a few days. Got back on it today. After installing a plain ball bearing on the stepper motor end of the table, I started on the connectors and making up the electrical cables.

I finished the cables. One end has the DB9 connector for the Gecko controller and the other end will connect to the steppers.

I used 1.25" x 1/8" aluminum angle to hold the connectors. As you can see, the angle is attached to the motor with zip ties which are clamped down pretty tight. Doesn't seem to be any movement.

I still need to solder the motor wires to the back end of the connector sockets.
Chuck
-
12-06-2013, 05:08 AM #65
Registered
- Join Date
- Dec 2006
- Posts
- 73
I revised the connector mounts. Hopefully these will be a little stronger and will be less prone to induced noise.

The motors are all wired now and the cables are finished. Next I need to find a DB25 cable and two timing belts for the X/Y drives.

I also revised the X-axis motor mount.

It now has a sliding adjustment with two 3/8" bolts to secure it. Don't think that's going to slip on me...
Chuck
-
12-08-2013, 12:04 AM #66
Registered
- Join Date
- Dec 2006
- Posts
- 73
After some more work today, I am 2 timing belts and a DB25 cable away from having this thing operational.

That's not to say that I'm finished... still have a bunch of tidying up to do including keying the pulleys, making guards and covers, and doing some cable routing. But with the two belts installed and a DB25 cable to hook it up to the computer, it would be capable of making parts.
Chuck
-
12-08-2013, 02:21 AM #67
Gold Member
- Join Date
- Mar 2004
- Posts
- 1806
Chuck,
Looks real good and you did it quickly. It took me about 6 months to get where you are right now!!!
It should serve you well.Art
AKA Country Bubba (Older Than Dirt)
-
12-08-2013, 09:38 PM #68
Registered
- Join Date
- Dec 2006
- Posts
- 73
Thanks, Art.
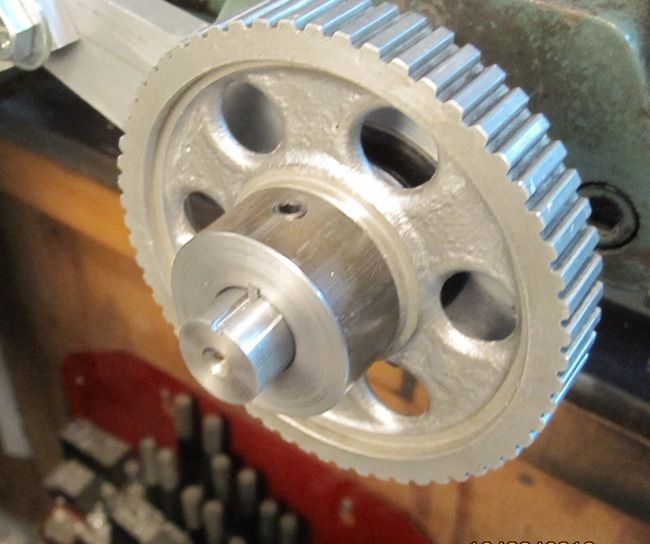
Waiting on belts and cables, so I started making the keyways in the pulleys today. I plan to use a Woodruff key on the shaft.

I figured it was easiest to use my keyway broach to make the slot in the pulley. Naturally, I didn't have a 17mm bushing so I had to make one. You can see that I milled two slots in the bushing, one shallower than the other. I first made a pass using the deeper slot, the a second pass with the shallower slot to make the keyway in the pulley deeper. Still need to do the pulley on the Y-axis. It's kind of nerve-racking pushing a broach through the pulley using my hydraulic press. Gotta make sure everything is completely lined up to keep from snapping the broach.
Chuck
-
12-08-2013, 11:25 PM #69
Gold Member
- Join Date
- Mar 2004
- Posts
- 1806
Looking good!
Yeh, I still have the "shims" for my broach set so if I need a custom bushing, I can still use them.
Your getting close!Art
AKA Country Bubba (Older Than Dirt)
-
12-10-2013, 02:15 AM #70
Registered
- Join Date
- Dec 2006
- Posts
- 73
Still waiting for the belts and the DB25 cable, so today I finished up the keyways.
I cut a standard keyway instead of woodruff. That gave me a lot longer key. I used a 3/32" carbide end mill to cut the keyway in the shaft. Easier than I thought it would be. I made the key out of some .093" sheet steel I had on hand.
Hope the cable and belts get her tomorrow. I'm anxious to get this thing working!
Chuck
-
12-14-2013, 02:42 AM #71
Registered
- Join Date
- Dec 2006
- Posts
- 73
Just a quick update. The DB25 cable was delivered a couple of days ago. I got the motors, the Gecko controller, cables and the power supply all hooked up. Loaded up Mach3 and got everything configured. The steppers all respond and move correctly to the Mach3 commands. Even loaded up a small G-Code file and ran it. Unfortunately, I still haven't received my X & Y timing belts (Aarrgghh!). So, even though the motors spin, the table doesn't move... Wish I'd ordered the belts sooner. Now that it's virtually done, the waiting is killing me!
Chuck
-
12-17-2013, 10:33 PM #72
Registered
- Join Date
- Dec 2006
- Posts
- 73
Got the belts today. Here's a picture of the first job...

Video is still uploading to Youtube... will post the link later.
Chuck
-
12-18-2013, 12:29 AM #73
Registered
- Join Date
- Dec 2006
- Posts
- 73
Here's the video...
Chuck
-
12-18-2013, 01:37 AM #74
Gold Member
- Join Date
- Mar 2004
- Posts
- 1806
Looking good! Now your ready for some serious chip making! Its a great feeling to watch that first coordinated movement:})
Congratulations on a job well done.Art
AKA Country Bubba (Older Than Dirt)
-
12-18-2013, 07:11 AM #75
Registered
- Join Date
- Dec 2006
- Posts
- 73
Thanks, Bubba. So, question for the group... I want to do some profile cutting in aluminum plate (I'm guessing it's 6061) using a 1/8" Kycera, 2 flute solid carbide bit. My milling spindle will only do about 2500 RPM. How fast should I feed the work and what depth of cut would be best? I've currently got it set at 12 inches per minute. I've looked at several web pages and they start talking about surface feet per minute, inches per tooth, and other terms that I just don't understand.
-
12-18-2013, 07:22 AM #76
Registered
- Join Date
- Sep 2013
- Posts
- 88
I'm doing a similar speed with hss cutter. 1mm doc.
But haven't had time to optimise.
Sould be able to go faster with carbide though.
Reasonable starting point.
Sent from my GT-I9100T using Tapatalk
-
12-18-2013, 07:59 AM #77
Gold Member
- Join Date
- Feb 2006
- Posts
- 7063
What depth of cut? What width of cut? What is the flute length of the tool? What is the shank diameter? What is the "stickout" - length flrom the bottom of the tool holder to the tip of the tool? All of these things affect feedrate. One thing for sure - at only 2500 RPM, 12 IPM is WAY too fast, and the tool will oubreak before long, or at least get dull very quickly. Originally Posted by cffellows

Just as a crude rule of thumb:
For aluminum, SFPM should be about 300-400 for a HSS tool, and 900-1200 for carbide. RPM is approximated as:
RPM = 4 * SFPM / ToolDiameter
For a 1/8" carbide tool, this gives 16,000 RPM.
Feedrate is approximated as:
Feedrate = RPM * #Flutes * Chipload
Chipload is approximated as:
Chipload = 0.008 * ToolDiameter
So, for a 1/8" 2-flute tool,
Chipload = 0.008/8 = 0.001"/tooth
Feedrate = 16,000 * 2 * 0.001 = 32 IPM
But, since you can't go 16,000 RPM, you must scale feedrate proportionally:
ActualFeedrate = 32 * 2500 / 16,000 = 5 IPM
As you go deeper, you'll have to reduce both RPM and feedrate. Use the sound, and the resulting surface finish to guide you. Too deep, too fast, or too low RPM will result in broken tools, and poor surface finish. To slow, too high RPM, or not enough coolant will result in a hot tool, cold chips, and chips welding to the tool. When everything is right, the sound will be smooth and consistent, the chips will be coming off hot, and the tool will remain cool, and will not clog up.
These are crude calculations that won't get you anywhere near ideal results, but they are conservative, and will get you in the ballpark. The 2500 spindle speed will pretty much cripple you, even with larger tools. And while using carbide may benefit you for SMALL tool (under 1/4"), due to its increased stiffness, it's a complete waste of money on larger tools, as you simple don't have the RPMs to take advantage of carbides performance advantages. Carbide tools are not only 2-4X the price of HSS, but they are also MUCH easier to damage, especially by re-cutting chips. So, keep the cut path clear using coolant or at least compressed air.
Regards,
Ray L.
-
12-18-2013, 08:19 AM #78
Registered
- Join Date
- Sep 2013
- Posts
- 88
Further to my earlier post.... I miss read you cutter dia. I was talking about 12ipm on a 1/4" cutter
Sent from my GT-I9100T using Tapatalk
-
12-18-2013, 04:54 PM #79
Registered

- Join Date
- Oct 2008
- Posts
- 2100
FSWizard
LOOK AT EVERYTHING and use coolant. You might get away with cutting oil and compressed air to blow chips clear, but Zero assumes you are using high volume flood coolant when cutting aluminum.Bob La Londe
http://www.YumaBassMan.com
-
05-04-2014, 07:21 PM #80Georgie Guest
Re: Rong Fu RF30 Conversion
Hi Chuck,
I have an Eagle25 which I'm sure is identical to the Rong Fu25.
I plan to replace the X & Y screws with 1605 ball screws and nuts.
I dont see anywhere any mention of replacing the Zee screw.
I plan to use Mach Mill as I Already use it on my Flatbed 3 axis Router. Ideally I want to use 1605 screws for all 3 axis on the mill.
Would you care to share any dxf drawings of your mounting plates for the Z stepper motor.
Also I would be grateful for any dimmensions on the replacement ballnut housing for the x & y axis.
Maybe you or someone else can help.
Many thanks
Georgie Oldham UK

 Reply With Quote
Similar Threads
-
Rong Fu reverse conversion
By kevrongfu in forum Benchtop MachinesReplies: 6Last Post: 12-13-2013, 12:58 PM -
starting rf30 conversion
By jbors in forum Benchtop MachinesReplies: 0Last Post: 12-08-2013, 05:38 PM -
rong fu 30 mill cnc conversion help
By kiyoukan in forum Uncategorised MetalWorking MachinesReplies: 3Last Post: 02-08-2012, 08:09 AM -
Rong Fu RF 45 CNC Conversion
By JackSmith in forum Knee Vertical MillsReplies: 15Last Post: 02-06-2011, 06:21 PM -
RONG FU RF-31 Conversion Servo or Stepper
By rpcaster in forum Knee Vertical MillsReplies: 2Last Post: 04-26-2007, 03:09 AM
