


Well, I'm finally getting around to giving Mini Beast his next major upgrade. Cheap and functional are the design goals. This thread will act as a build log, in addition to me asking some questions and advice of our gracious cnc zone members who know way more than me.
I think I'm going to use wood and a base similar to this guy's. Also, I was thinking of using this for the coolant pump and reservoir. I'm still unsure of exactly how I'm going to filter the returning fluid. Also, can someone suggest a good coolant to use? There seems to be so much to choose from.
Thread: Flood Coolant Enclosure
Results 1 to 20 of 26
-
12-03-2009, 10:59 PM #1
 Registered
- Join Date
- May 2009
- Posts
- 43
Flood Coolant Enclosure
DISCLAIMER: I'm a noob
-
12-04-2009, 02:30 PM #2
Registered
- Join Date
- Feb 2009
- Posts
- 41
EnviroServe Chemcals has some great coolants.
www.enviroservechemicals.com
-
12-11-2009, 03:03 AM #3
Gold Member
- Join Date
- Sep 2006
- Posts
- 1738
I'm going to post some pics of my enclosure for you, I have one of the best designed filtration systems...I think. I never get chips in the tank.
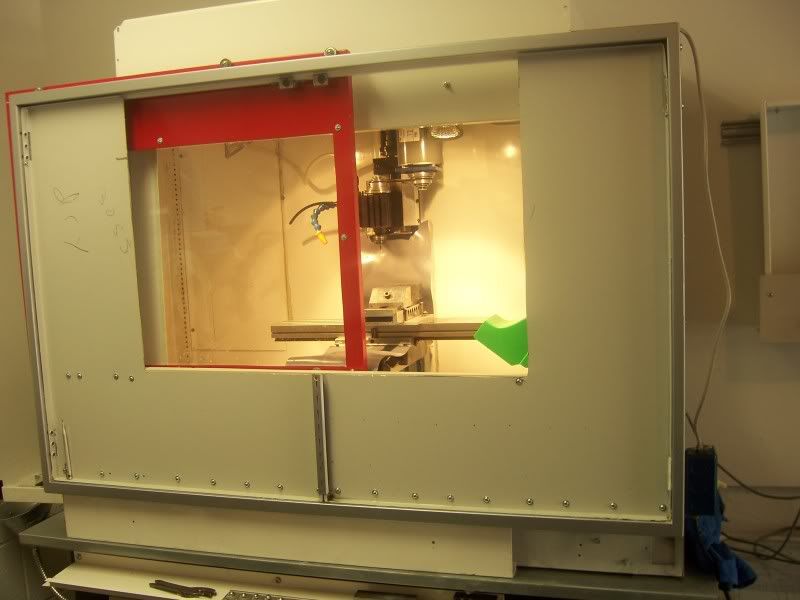

Enjoy
-
12-11-2009, 10:21 PM #4
Registered
- Join Date
- May 2009
- Posts
- 43
Thanks for sharing, Speeds.
I like your design. It's really simple and looks like it would be easy to clean. What type of coolant do you use?
DISCLAIMER: I'm a noob
-
12-12-2009, 01:28 AM #5
Member
- Join Date
- Jan 2005
- Posts
- 15362
Mini Beast
If you are in your home you want to use GreenCut
http://www.greencut.com/Mactec54
-
12-12-2009, 06:22 AM #6
Gold Member
- Join Date
- Sep 2006
- Posts
- 1738
Mini beast- I have to be honest, I don't know. I was given a 2 liter bottle of this blue coolant from my GF's father (Machinist...duh), it was given to me about maybe, two years ago? Still have more than half the bottle, love the way smells; I must be a freak lol but it's fantastic, doesn't get all gross and stinky, just has a nice machine coolant smell.
I'll try and find out tomorrow. If your interested in how my coolant system works, just ask, but it's pretty simple to see.
-Jason
-
12-12-2009, 06:37 PM #7
Gold Member
- Join Date
- May 2005
- Posts
- 2502
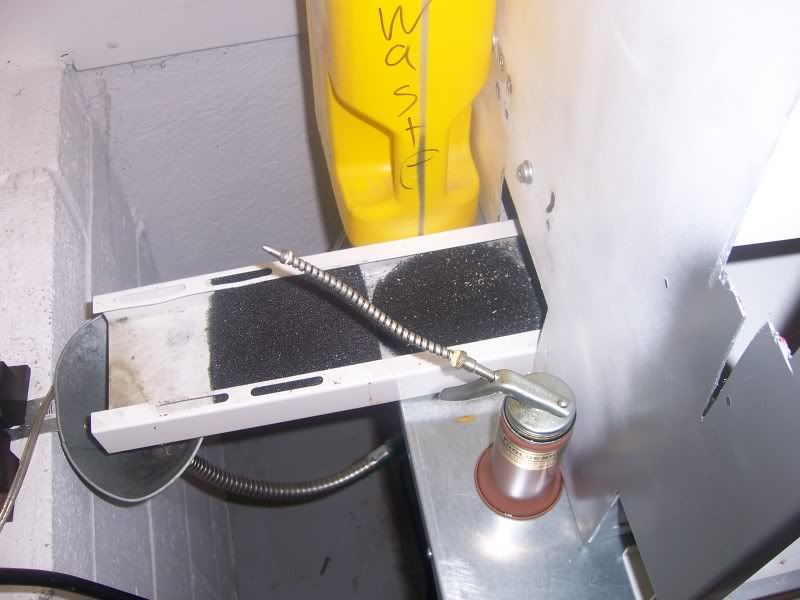
Jason, would love to know more. For example, the picture of the coolant chute. At first I thought you had done that to make it easy to clean out the chips, but now I'm wondering if it isn't like a gold sluicer to separate the chips?
Cheers,
BWTry G-Wizard Machinist's Calculator for free:
http://www.cnccookbook.com/CCGWizard.html
-
12-12-2009, 07:12 PM #8
Gold Member
- Join Date
- Sep 2006
- Posts
- 1738
Bob- Most of the catching is done in the actual enclosure, inside is a hole for the coolant to drop into that angled beam. In the enclosure is one of the humidifier pads with some stock on top to keep it compressed; this catches the bulk of the chips. The key is not to have gravity and coolant force chips through a filter, so instead, the coolant and whatever chips get through they simply slide gently down the beam. The encounter the first filter and finally the last filter where simply coolant just falls out into the oil drain. The oil drain itself has a mesh screen that does catch one or two chips that gets through, but nothing in the tank. Clean up is easy, just need to stick the vacuum cleaner down along side the beam and get those chips.
-Jason
-
12-16-2009, 07:12 PM #9
Registered
- Join Date
- May 2009
- Posts
- 43
Thanks for the suggestion, this stuff sounds pretty good. Lots of good information on their website, but it astounds me they don't leave any clue about how to purchase the stuff. Is it possible to order this stuff? Originally Posted by mactec54
 DISCLAIMER: I'm a noob
-
12-16-2009, 10:29 PM #10
Member
- Join Date
- Jan 2005
- Posts
- 15362
Mini Beast
Pm me I have it in stockMactec54
-
12-18-2009, 04:27 PM #11
Registered
- Join Date
- May 2009
- Posts
- 43
Here is the progress so far. This isn't near as fancy as some other enclosures I've seen, but I'm staying with my goals of cheap and functional. So far, it looks like my total cost will end up somewhere in the range of $200-300
1. Heavy wooden frame to be the stand
2. Fiberglass a 2x10 to make it waterproof. This will be the surface I mount the mill on and luckily the only fiberglass work I plan on doing this project. (That stuff is nasty!)
3. A concrete mixing tub that fits perfectly into the frame (yes, I planned it that way). I cut holes in it for the 2x10 to pass through and for a shower drain to be installed.
4. Lag screws secure the 2x10 and some silicone to keep the tub water tight.
5. Mini Beast fits in there like a glove! :banana:DISCLAIMER: I'm a noob
-
12-18-2009, 04:34 PM #12
Gold Member
- Join Date
- Sep 2006
- Posts
- 1738
Absolutely fantastic idea; however...how is the base supported in that tub? Is it secured tightly or what?
When I first started my enclosure a few years ago, this is what I had. I had the same exact tub mixer on a table, but my drain leaked etc.
-Jason
-
12-18-2009, 04:42 PM #13
Registered
- Join Date
- May 2009
- Posts
- 43
Thanks! In picture 4, you can see where lag screws go through the frame and into the ends of the fiberglassed 2x10. I did a couple of flying elbows onto it afterwards, and it is rock solid!
I figure I might have to patch some leaks when I test it. I actually had to cut a gasket to add to the drain because the tub material is thinner than what the drain is designed for and it wouldn't make a tight seal.DISCLAIMER: I'm a noob
-
12-18-2009, 04:49 PM #14
Gold Member
- Join Date
- Sep 2006
- Posts
- 1738
Didn't realize, but it looks good.
-Jason
-
12-21-2009, 05:39 AM #15
Registered
- Join Date
- May 2009
- Posts
- 43
Progress update
1. Enclosure built around the stand. Also, added a bottom shelf for the coolant resevoir.
2. The doors
3. First coat of paintDISCLAIMER: I'm a noob
-
12-21-2009, 11:46 PM #16
Gold Member
- Join Date
- Sep 2006
- Posts
- 1738
Wow, what a fantastic job you have done. Looks super awesome, I still have some features that I need to add to my enclosure, very excited about it.
Looking great.
-
12-22-2009, 03:47 PM #17
Registered
- Join Date
- May 2009
- Posts
- 43
Thanks, Speeds
I've been considering your design and the benefit of passing the fluid slowly through the filters. It makes sense to me now. I've already bought the parts washer and installed the shower drain, but I have a new idea for filtering that might work using some paint strainers. Hopefully, it works out good. If not, I might go back and add a slanted tray like you have and just put it under the shower drain.DISCLAIMER: I'm a noob
-
12-22-2009, 06:55 PM #18
Gold Member
- Join Date
- Sep 2006
- Posts
- 1738
I have been running coolant flood for over a year now and the filter system is top-notch.
Can't wait to see finished enclosure.
-Jason
-
12-29-2009, 07:35 PM #19
Registered
- Join Date
- May 2009
- Posts
- 43
Christmas was awesome... back to the project
This is the filter/pump system I came up with. I have no idea if it will work or not, but we will find out soon enough. Let me know what you think.
pics:
1. The only mods I did to the parts cleaner were to cut a hole in the lid and put a different fitting on the pump.
2. I used 2 paint strainers. A bucket type with plastic walls and a bag type with an elastic opening.
3. The bag type (which has a finer mesh) fits nicely around the bucket type. Notice the shelf on the parts washer has ridges, which I hope will allow fluid to easily run out the bottom of the strainers (hopefully a similar benefit to speedscustom's design).
4. A perfect fit! I put a 'drip loop' in the tubing, since I plan to run it directly up and out of the shower drain .
.
5. The entire system is about $85, using all new and readily available parts. It could probably be done cheaper, but I'll be really thrilled if it works good considering how easy it was to put together.DISCLAIMER: I'm a noob
-
01-02-2010, 12:50 AM #20
Registered
- Join Date
- Aug 2008
- Posts
- 63
coolant tub
I am impressed with some of the setups you guys have. I am in the process of flood cooling my Taig at the moment. I am keeping it pretty simple: plastic tub, pond pump, bucket etc... I was going to make a filter out of a bucket and some filter foam but I like the use of the paint strainers (I will check my hardware store). I have ordered a loc-line hose and I am going to make a manifold so I can run coolant or air from my compressor. My pump is 12v and I should be able to control it with mach3 without playing with mains voltage. If the coolant splashes around too much I will make it a shower curtain. Not pretty but I hope it will work. Please ignore my untidiness, my shed is still a bit of a mess.


 Reply With Quote
Similar Threads
-
Flood coolant evaporation
By rezcar in forum MetalWork DiscussionReplies: 4Last Post: 09-26-2009, 03:03 PM -
Flood coolant for a bandsaw
By tlyee63 in forum Uncategorised MetalWorking MachinesReplies: 5Last Post: 08-22-2009, 11:23 PM -
X2 Flood Enclosure
By mrcodewiz in forum Benchtop MachinesReplies: 9Last Post: 12-03-2008, 05:28 PM -
My new TAIG and enclosure...also flood cooling ?'s
By VTX in forum Taig Mills / LathesReplies: 34Last Post: 10-16-2007, 05:22 PM -
Flood coolant on steroids
By Scott_bob in forum DNC Problems and SolutionsReplies: 7Last Post: 04-30-2007, 07:07 PM
