


I guess complete at this point means 3-axis motion... My next plan is to use the machine to make itself better.
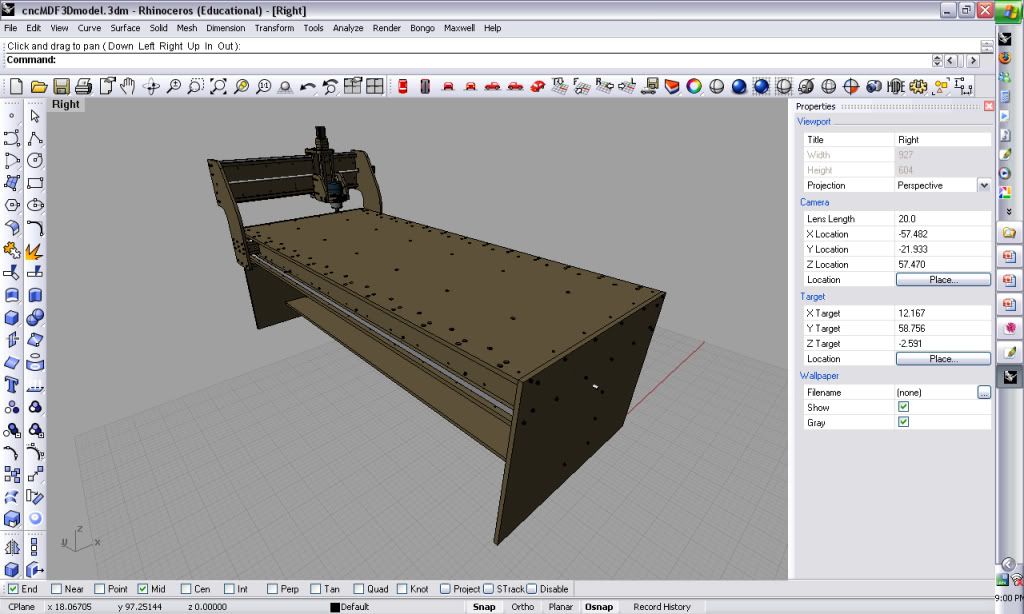
About a year ago I ran across BuildyourCNC.com after seeing a 'how to' on instructables.com. I used the fastening and rail techniques he describes there and found his video tutorials infinitely helpful. I began to lurk here and began designing my machine in Rhino.
Not only did I order the parts from Mcmaster Carr, but I found many of their digital models extremely helpful for designing using parts I didn't have yet...
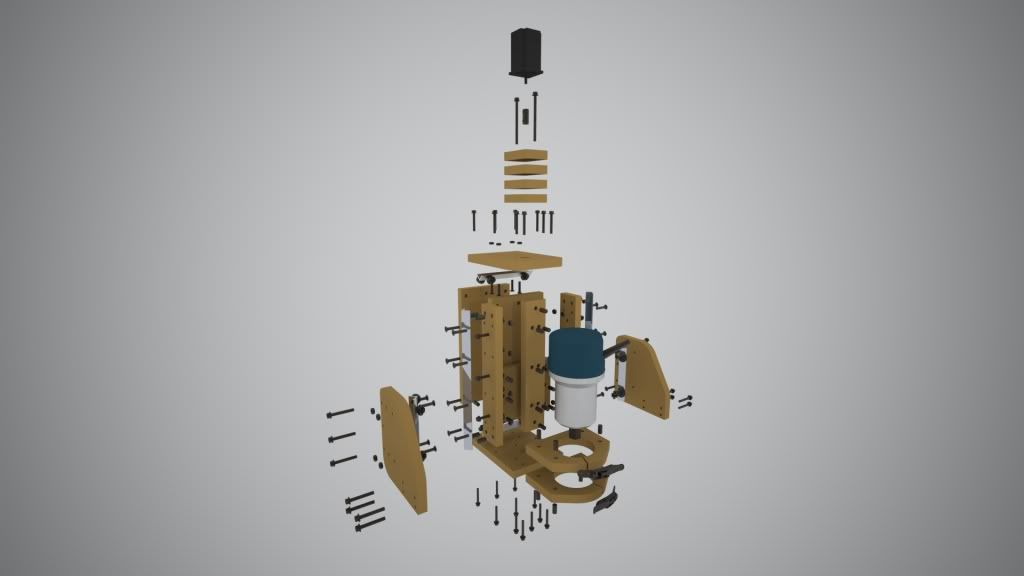
I detailed the machine as much as a could digitally. Here is a shot of the Z axis exploded...
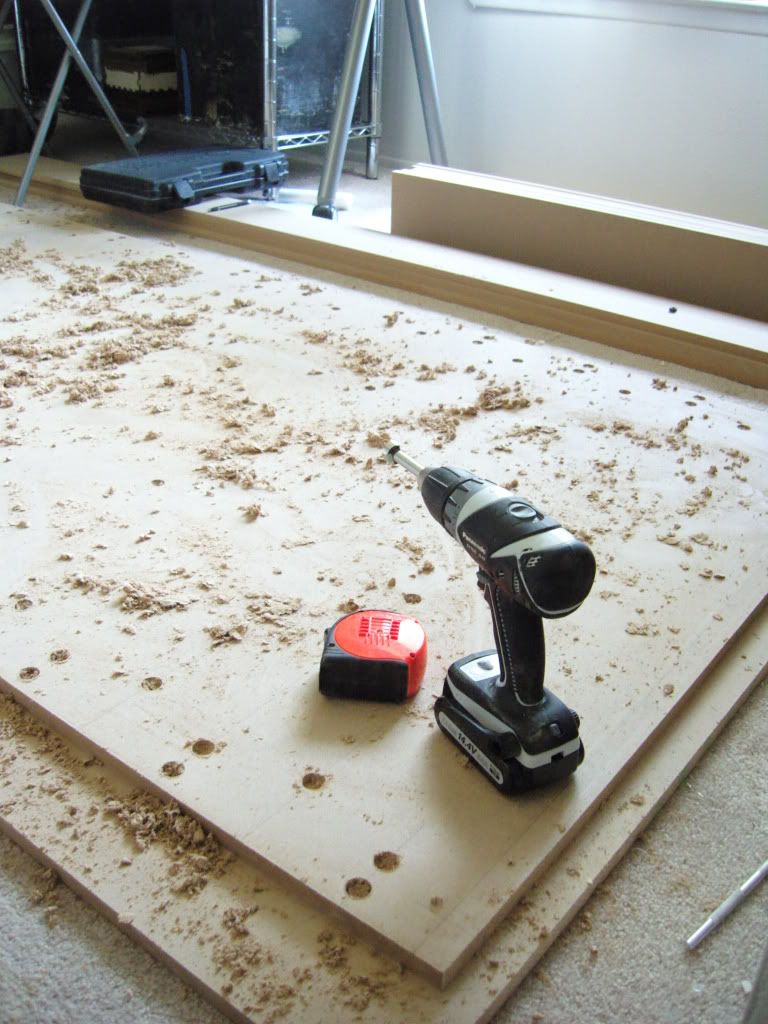
Then, I plotted the pieces 1:1 on Kinkos 40" plotter, spray mounted them to 3/4" MDF. At Home Depot I was able to get the stock cut into basic optimized shapes .
I used a friend's bandsaw to cut the parts out and began building...
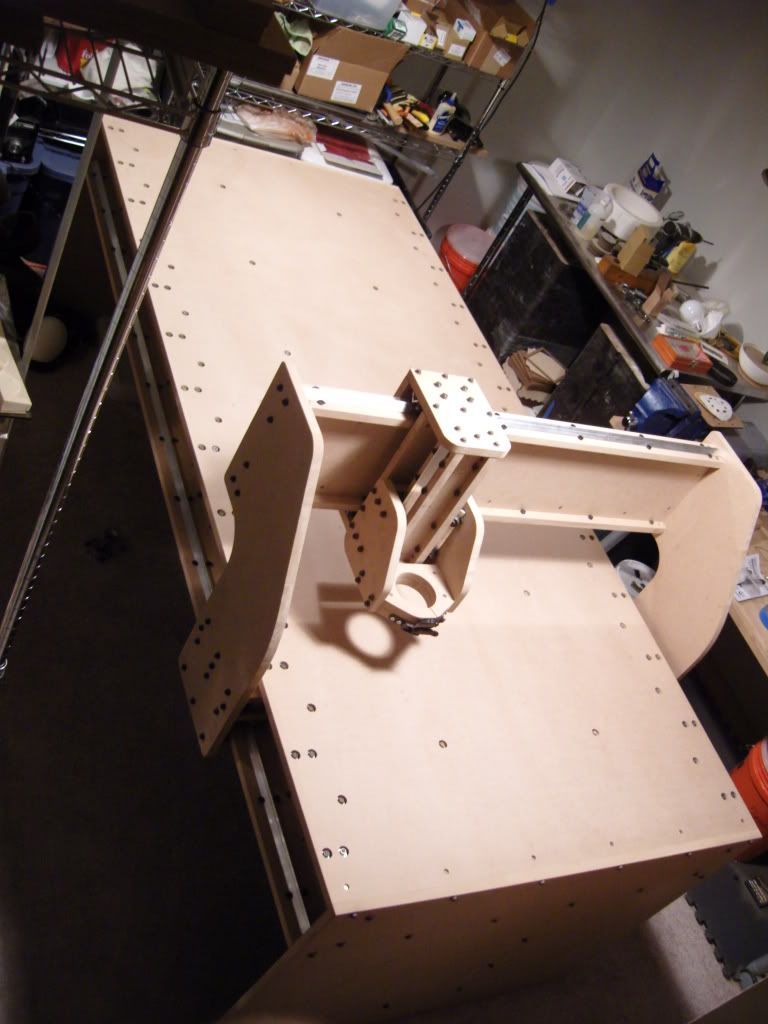
If I did it over again, I would take many, many more pictures... These are taken when the basic form of the machine had taken shape.
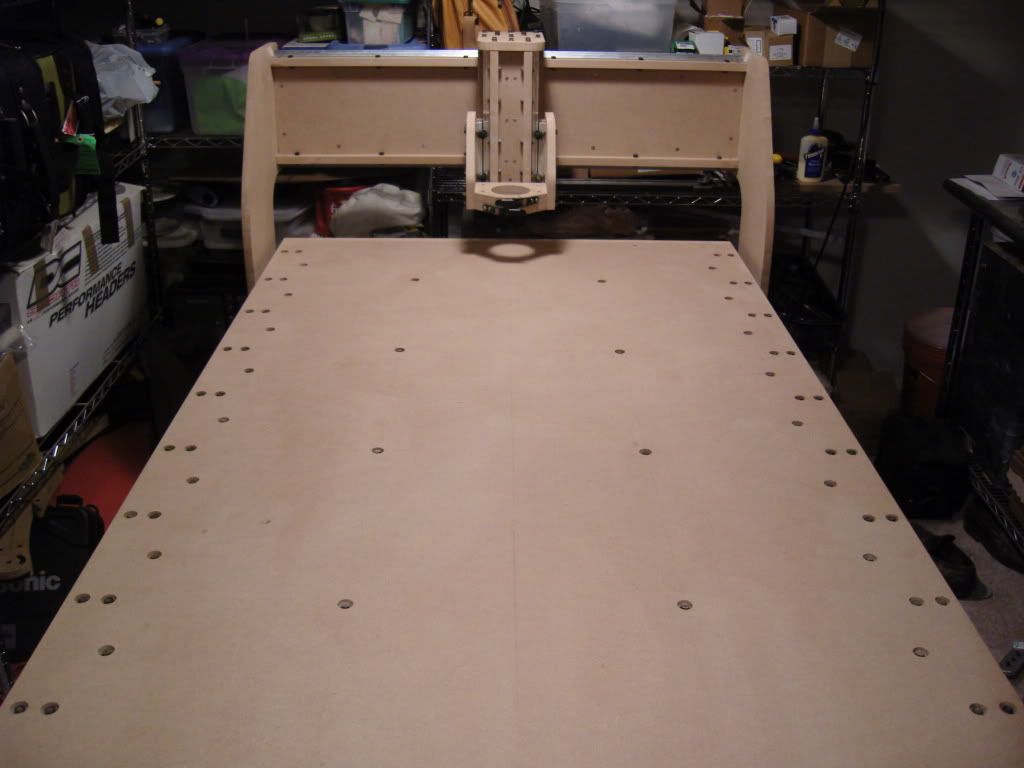
It is almost impossible to get a good picture of the whole table.. The table surface is 98-1/2" X 43" this leaves maybe 18" on all sides of the machine. Since I could not go full 48"... I used the 6" rip to make the side ribs..
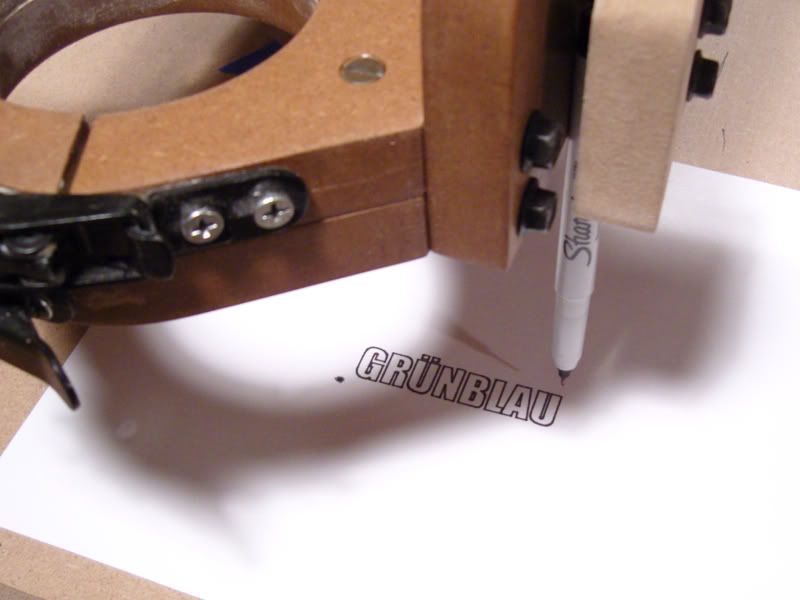
Here is a video showing the fluid motion of the 3 axis.. The stepper motor isn't attached at this point...
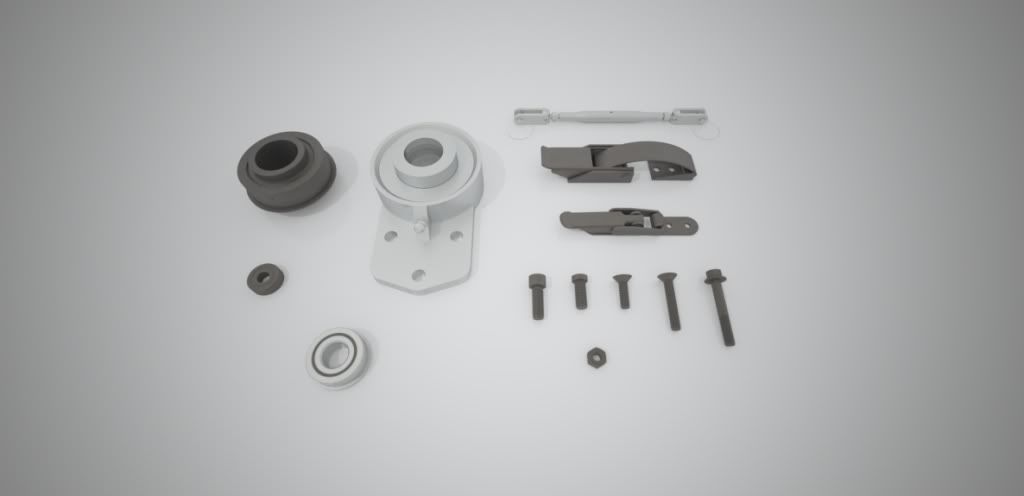
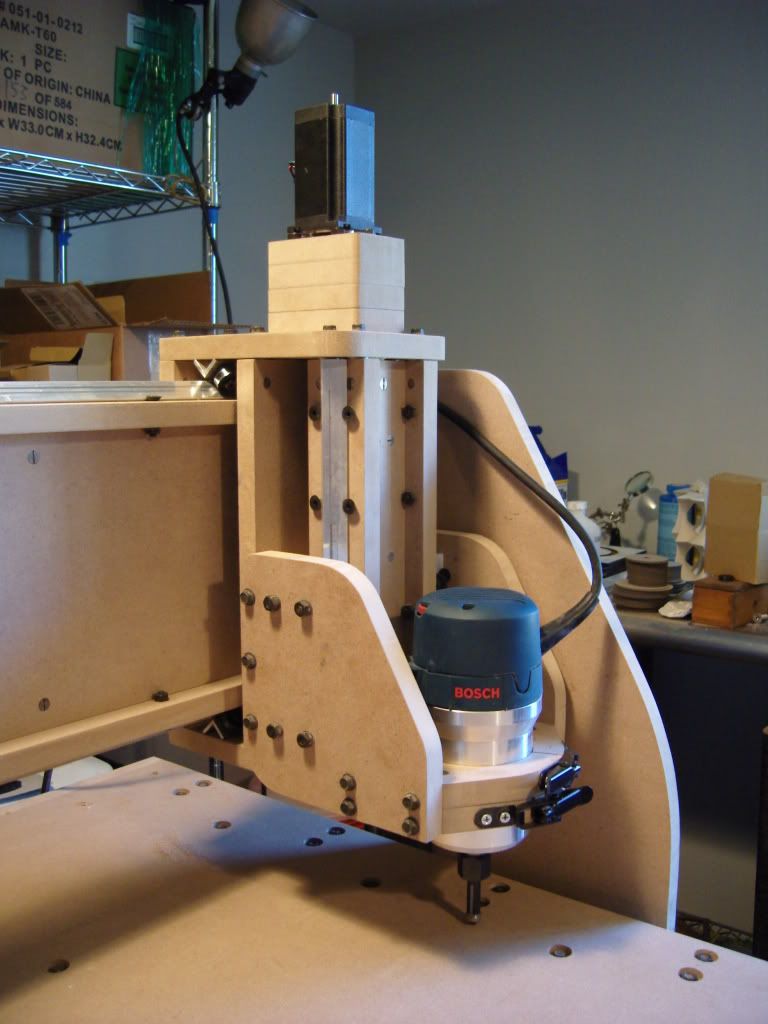
This is an image of the assembled Z axis...
After this point I broke the machine back down and polyurethaned all of the parts. I would hate to walk in there with a cup of coffee one morning and destroy the entire table with one bad step...
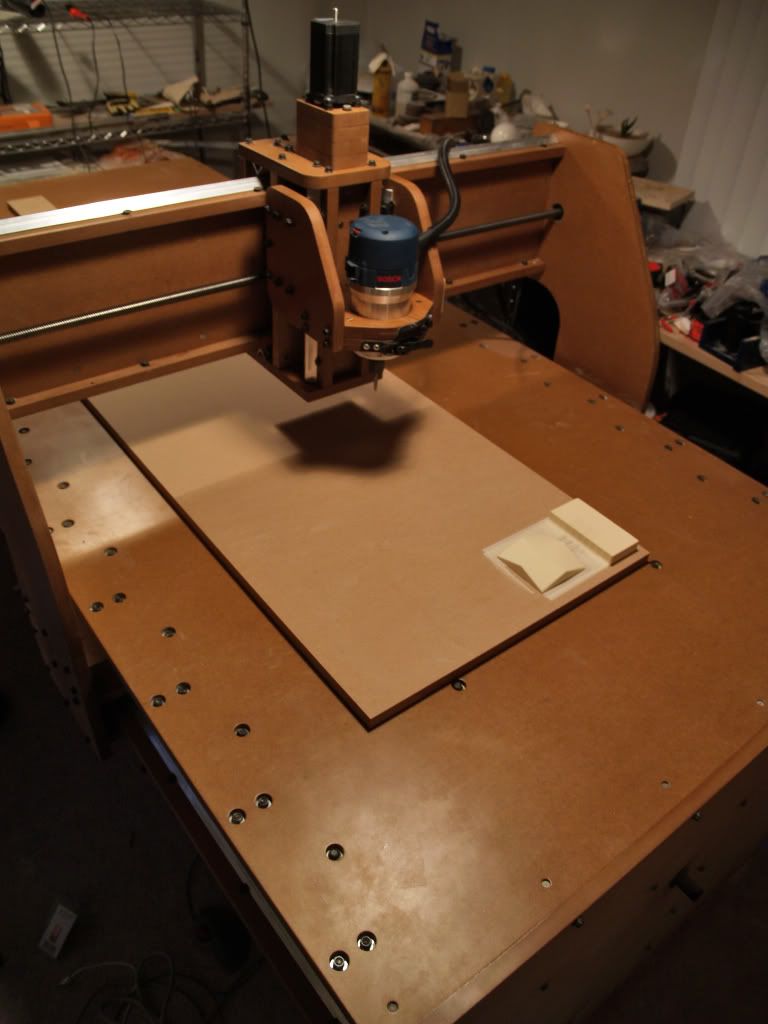
After reassembly and installing the lead screws, finishing up all of the motion components, and setting up the software I took it out for its first jog last night...
Then, the real test... lets "machine something"...
So far I am incredibly excited to get started using the machine... If I had any advice, it would be to start smaller I think. I have learned so much that it wouldn't take nearly as long next time. I started out with the idea if the whole thing failed, I would have a pretty sweet work table... or a base for a desktop shopbot etc... there is still quite a bit to do as far as cable management finding an appropriate space to machine in etc... I hope to have more information including pics of the transmission on the under side... as well as a basic accounting of everything. But I thought I'd make my first post and quit lurking so much!!
Brian
Results 1 to 20 of 114
-
11-26-2008, 01:44 AM #1
 Registered
- Join Date
- Jun 2008
- Posts
- 203
One years worth of pics and videos of my 43" x 98" MDF machine FIRST BUILD!!!
-
11-26-2008, 03:08 AM #2
Member
- Join Date
- Jun 2007
- Posts
- 41
Thats a nice machine. I want to see some videos of it cutting. keep up the good work.
-
11-26-2008, 04:47 AM #3
Gold Member
- Join Date
- Apr 2006
- Posts
- 3498
Very good quality output... Very Nice machine
 http://free3dscans.blogspot.com/ http://my-woodcarving.blogspot.com/
http://my-diysolarwind.blogspot.com/
-
11-26-2008, 05:11 AM #4
Registered
- Join Date
- Oct 2007
- Posts
- 18
Wow! Totally awesome. I hope you will post some or all of the CAD drawings.
Terrific work!
-
11-26-2008, 11:34 AM #5
Registered

- Join Date
- Aug 2005
- Posts
- 578
Well done!!
Bob
-
11-29-2008, 04:02 AM #6
Registered
- Join Date
- Jun 2008
- Posts
- 203
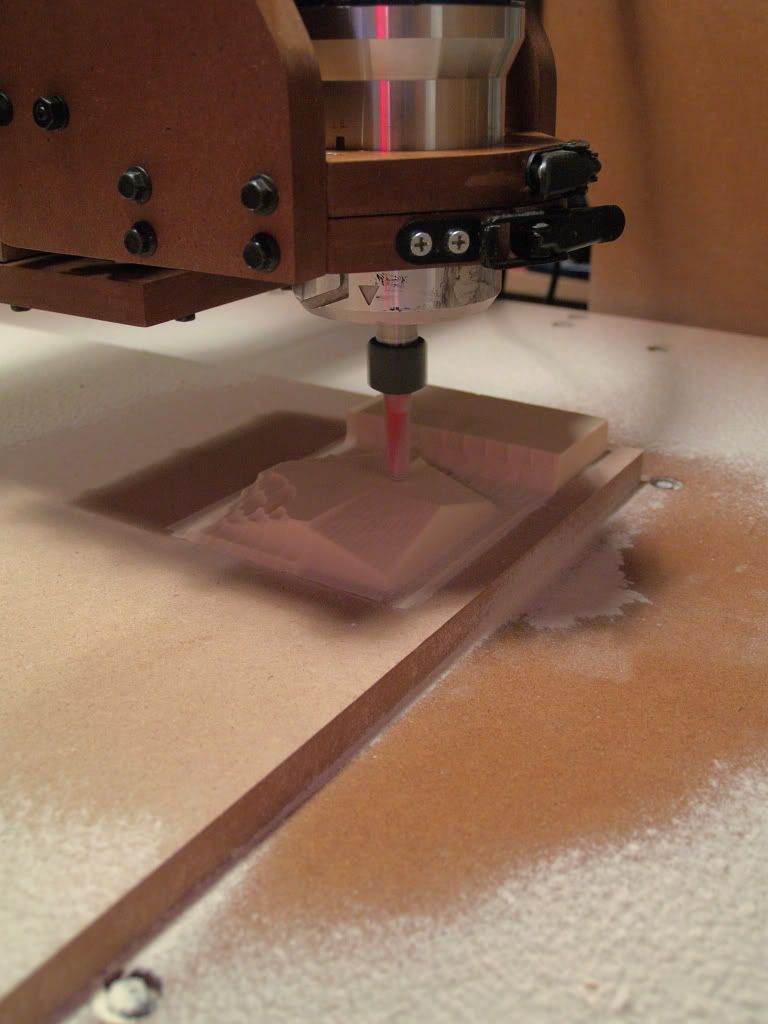
 First cuts with the machine!
First cuts went very well!!!
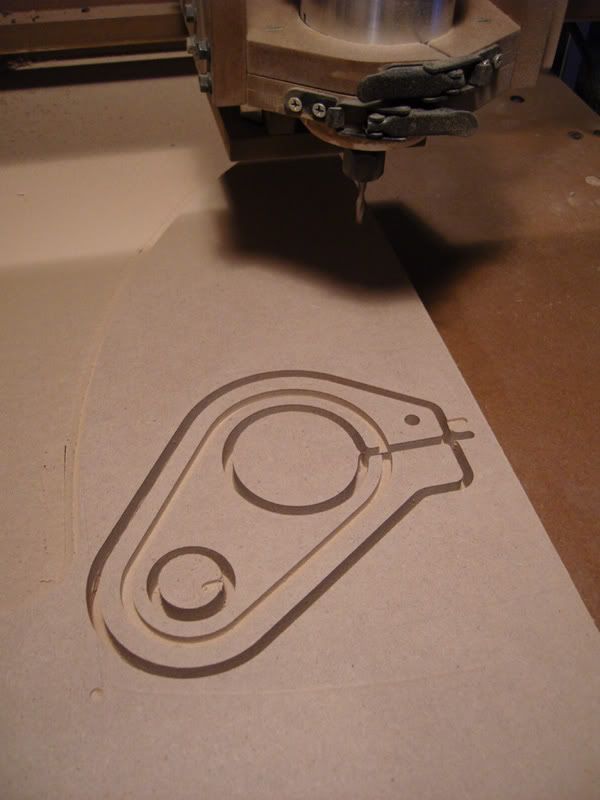
Here is the roughing step in rigid foam..

Beginning of the finishing step...
Finished finishing...
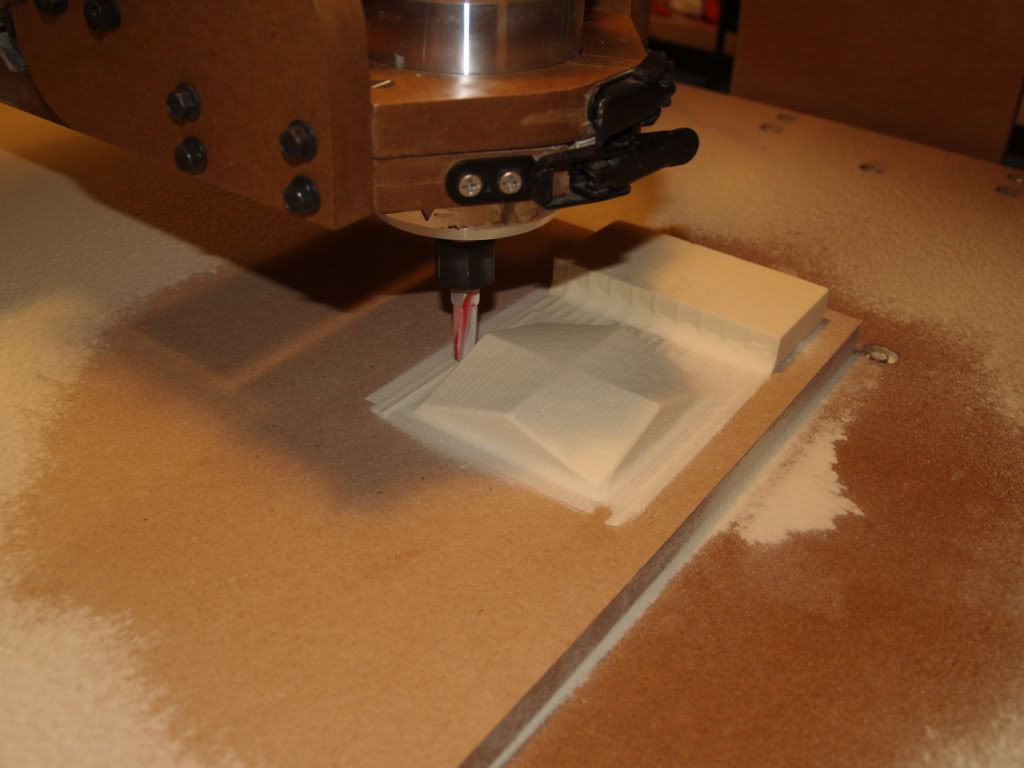
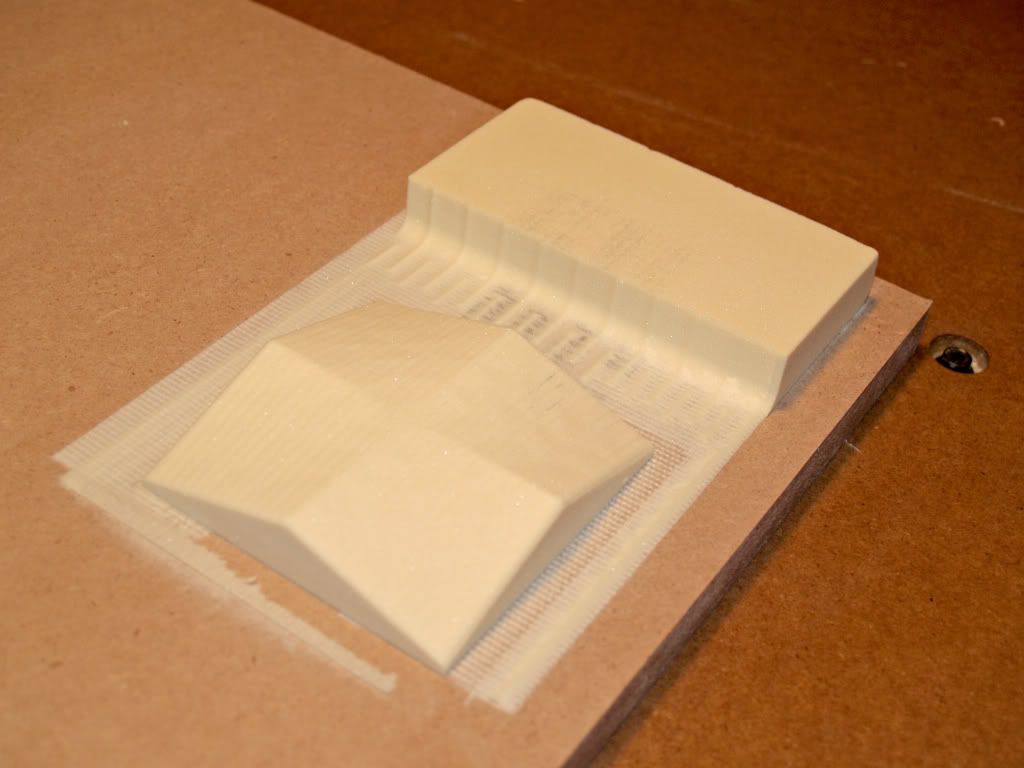
First 'machined' piece...
Close up view of piece...
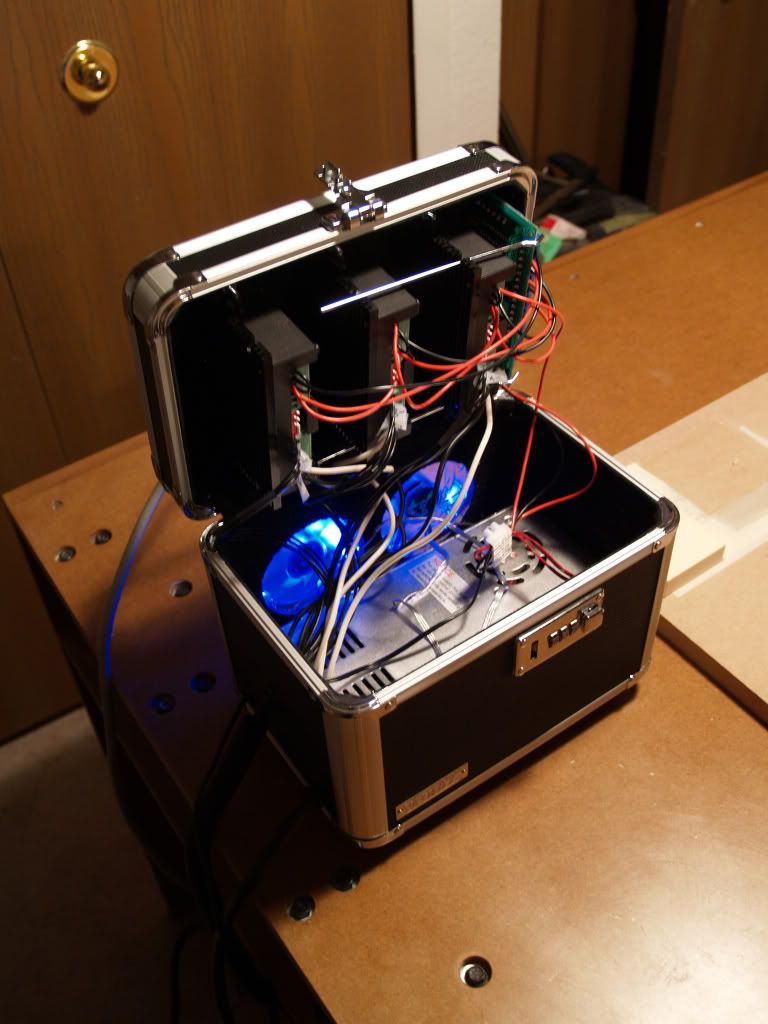
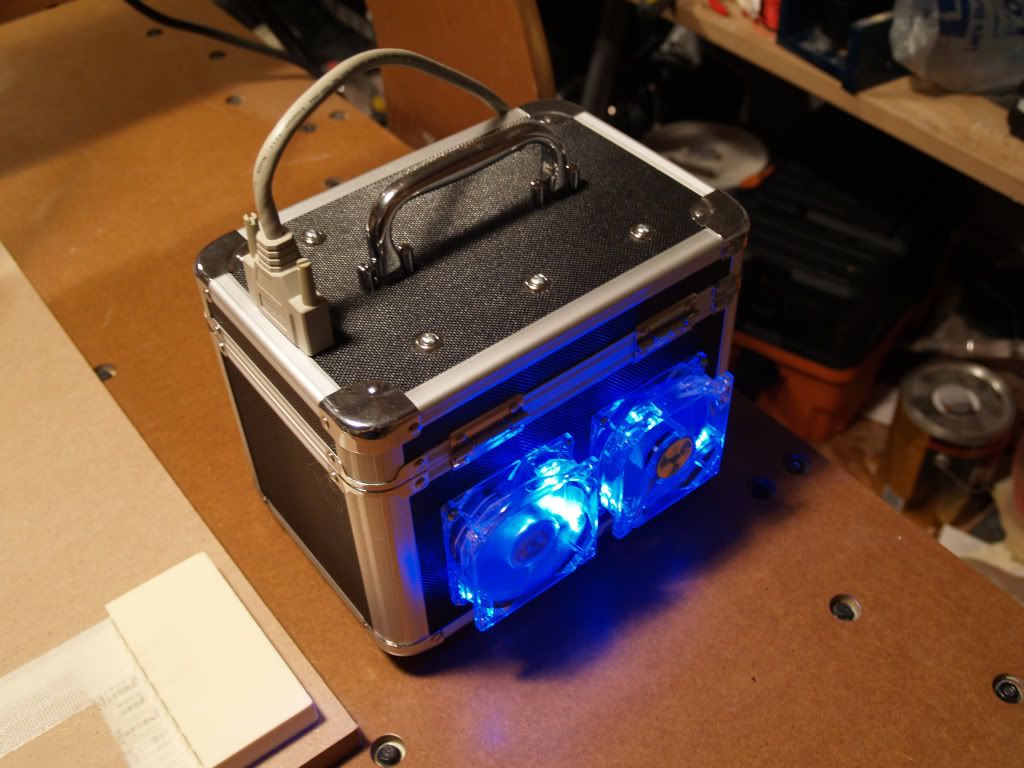
Here is a view of my custom cam controller box...
-
11-29-2008, 08:40 AM #7
Registered
- Join Date
- Oct 2008
- Posts
- 1147
Impressive planning and execution. Way to go. I hope you post more vids. Were there any problems that you ran into that you may want to share with a noobie like me?
-
11-29-2008, 05:25 PM #8
Registered
- Join Date
- Jun 2008
- Posts
- 203
I didn't really run into a lot of problems.. One major suggestion I'd have is to go with 1/2" lead screws... I went with 5/8"-8 2 start (4 TPI). There is huge support for 1/2" Like the dumpster nuts etc... not so much for the 5/8". Originally Posted by FandZ

Start smaller than I did. My thinking was that my gantry would look the same for a 48" table as it would for a 96" table... why save the 20$ in MDF and $50 in lead screw? I am glad I have the working area, but I am already working on revisions and a smaller table design.
Take the addage that 'no one builds only one table' as fact... Your first hobby cnc is where you learn how to build your second cnc. Select components that you could eventually transfer to version 2.
Good luck on your build!!
-
11-29-2008, 06:50 PM #9
Member
- Join Date
- Apr 2007
- Posts
- 8082
Very nice workmanship on your machine. You spent considerable effort in the finishing of the MDF parts. Is that satin polyurethane with no stain? Clean looking machine design as well. Congrats.
CarveOneCarveOne
http://www.carveonecncwoodcraft.com
-
11-29-2008, 10:32 PM #10
Registered
- Join Date
- Jul 2006
- Posts
- 215
I'll second that! Originally Posted by rgarrett7
-
11-30-2008, 12:55 AM #11
Registered
- Join Date
- Jun 2008
- Posts
- 203
Thanks!!! About 3 coats of satin polyurethane sanded with 220 between coats... Originally Posted by CarveOne
-
11-30-2008, 02:13 PM #12
Member
- Join Date
- Apr 2007
- Posts
- 8082
I thought so. It looked familiar. Originally Posted by Grunblau
It's exactly what I did on the two 4'x8' MDF tops of the work tables I recently built for my workshop. Even used the 220 grit sandpaper.
CarveOneCarveOne
http://www.carveonecncwoodcraft.com
-
11-30-2008, 02:33 PM #13
Platinum Member
- Join Date
- Mar 2008
- Posts
- 80
Great job, from your photos it's easy to see the workmanship that went into your build.
Where did you get your lead screws? I didn't see any multistart screws at Mcmaster longer than 6'
Are you seeing much whip on the long screw?
-
11-30-2008, 05:30 PM #14
Registered
- Join Date
- Jun 2008
- Posts
- 203
Thank you! Originally Posted by gfc62
I purchased my lead screws and nuts from www.roton.com.
I am not seeing any whip because I chose to turn the nut instead of turn the screw...

This involved using my drill press as a lathe. I fastened the aluminum pully to a drill bit in my drill press and 'turned' the pulley to fit inside of the bearing assembly. When this was done, I drilled out the center of the pulley with a 3/4" bit, and 5 minute epoxied it into the bearing. The brass nut slips in the other side and is held by the two set screws on the bearing...
-
12-01-2008, 01:29 PM #15
Platinum Member
- Join Date
- Mar 2008
- Posts
- 80
Nicely done.
I gave serious consideration to a rotating nut design for lengthening my machine but am probably going to use a rack & pinion drive since I have had some small amount of experience with those and none at all with rotating nut designs.
Would you show some more detail of the bearings used on your rotating nut? From the photo it looks like you may have bearings only on the side with the aluminum plate, is this true? Are you using separate radial and thrust bearings, or a combined bearing?
Gordon
-
12-02-2008, 12:19 AM #16
Registered
- Join Date
- Apr 2005
- Posts
- 101
more details, pleeease
Originally Posted by rgarrett7
Wow! Totally awesome. I hope you will post some or all of the CAD drawings.
Terrific work!
Originally Posted by slammedxonair
I'll second that!
I'll third that...
Sir, you are a great craftsman - The quality of your build is amazing, and apparently
you achieved it practically without using table tools...
But I (and many others, I'm sure) would like to see so much more:
How are the linear guides (Alu or steel V profiles, it seems - ground?) and the sliders
(skate bearings?). How are the guides and sliders attached to the MDF?
Are the screws Acme? How about the nuts - any kind of anti-backlash trick (your video
shows that you seem to have very little backlash). How are the screw ends attached?
Your rotating nut is amazingly simple - can you show more details? I assume only the
long axis uses the rotating nut; how about the nuts in the other two axes?
Your "custom cam controller box" is also incredible: neon-lit fans!!! What is in it?
did you build your steppers drivers and power supply?
Sorry about all these questions, but anything you are willing to disclose or share
(pics, drawings...) would be a great help for us beginners...
-
12-04-2008, 05:48 PM #17
Registered
- Join Date
- Dec 2008
- Posts
- 2
Grunblau,
Have you had a chance to get gather a complete materials list and pricing for your machine? I"m new to the thought of building your own CNC and am looking forward when I have a chance to build my own. Also, any suggestions for a beginner would be helpful. Thanks.
-
12-09-2008, 01:26 AM #18
Registered
- Join Date
- Apr 2007
- Posts
- 7
Awsome
Hey what a great job you have done. I myself are currently building ny first machine ( the one from buildyourowncnc). I have the table, gantry and some other parts cut out ready for assembly but I like what you have done. It looks like a cross between Patricks and the D-model from Rockcliffe. Are you going to post the plans as I am thinking of adapting some of those brilliant ideas you have incorporated.
Well Done, Mick
-
12-15-2008, 08:51 PM #19
Registered
- Join Date
- Jun 2008
- Posts
- 203
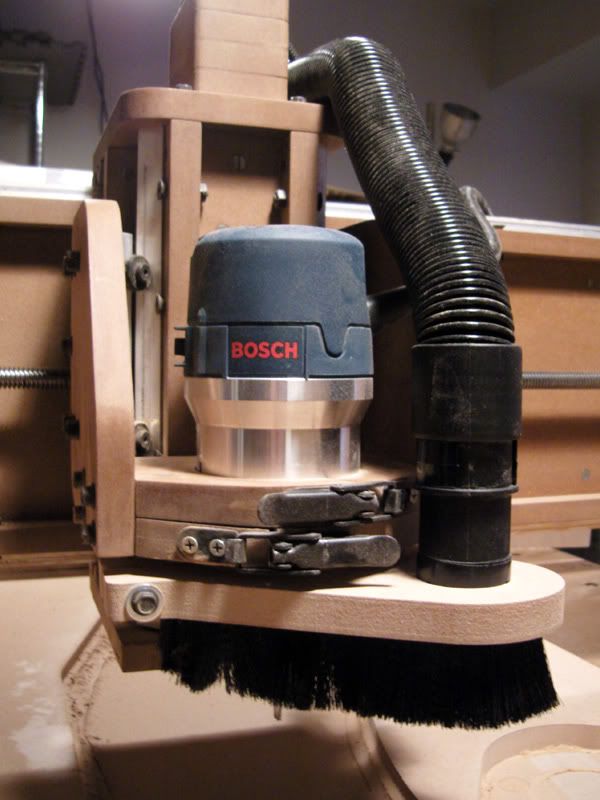
Quick vacuum holder...
Cut out a quick vacuum holder this weekend. I bought 3 hose attachments for the bristles... anyone have a good source for this stuff?
Here it is cut out... Notice all of the dust, I had to do something.
I five minute epoxied the bristles in the groove...
all done... Not too shabby of a cut...
-
12-16-2008, 06:08 PM #20
Registered


- Join Date
- Apr 2008
- Posts
- 235
Simply amazing work - thanks for sharing
gets me pumped up to work on my #2 machine!
How's the racking - are you seeing any?
I really dig the rotating nut idea - my latest is 60" long and that's going to really work for me I think (I was getting a lot of whipping with the 1/2 acme rod) - are there any disadvantages to that idea?


 Reply With Quote


Similar Threads
-
Trying to find out more information about a "misterious" CNC used machine -see pics
By jcatanduva in forum Want To Buy...Need help!Replies: 4Last Post: 12-23-2013, 11:52 AM -
X Axis "Goes Off Pattern", "Awry", "Skewed", "Travels"
By DaDaDaddio in forum Laser Engraving / Cutting Machine General TopicsReplies: 1Last Post: 05-06-2013, 09:59 AM -
CNC Router-20"x20"x4" Build or buy machine?
By cbstephenson in forum DIY CNC Router Table MachinesReplies: 3Last Post: 06-04-2010, 08:02 AM -
Solsyva 24" x 48" build, 1st machine
By nikbrewer in forum CNC Wood Router Project LogReplies: 10Last Post: 09-17-2008, 12:27 PM -
17 Years of "Grime" on an Axis card
By donl517 in forum FadalReplies: 8Last Post: 12-28-2007, 12:02 AM
