


Thanks! :-)
Me and a coworker were talking about the cracked bearings yesterday and it turned out that he used to be an avid skater - he mentioned a skate bearing company I haven't heard about before: Bones Swiss
Looking at some skateboard and inline forums, everyone seems to swear on these bearings for their durability, so I looked at the company website.
Interestingly enough, this company refuses to ABEC rate their bearings:
Abec vs. Skate Rated? - Support - Bones Bearings
<Quote>
The dimensions and tolerances controlled by the ABEC standards include the diameters and widths of the raceways, their shapes to some extent and the smoothness of the running surfaces. The ABEC rating system ignores side loading, impact resistance, materials selection and grade, appropriateness of lubrication, ball retainer type, grade of ball, the clearance between the balls and the races, installation requirements, and the need for maintenance and cleaning. All these bearing design requirements are very important to the performance of your skate bearing, even though the ABEC rating says nothing about them.
<End Quote>
These are not cheap, about $40 for a set of 8 on Amazon. They have a lifetime warranty, which I probably won't take them up on if I break one, since it's not the intended use.
I just ordered two boxes and will replace the next ones that fail with these, hopefully they will last longer...
--
Mac
Thread: Build thread: Mac's Momus X2S
Results 121 to 140 of 166
-
04-08-2014, 04:06 PM #121
 Registered
- Join Date
- Mar 2013
- Posts
- 209
Re: Build thread: Mac's Momus X2S
-
04-08-2014, 04:27 PM #122
Gold Member
- Join Date
- Jun 2004
- Posts
- 6618
Re: Build thread: Mac's Momus X2S
I recently had a cracked bearing on my CNC Router parts plasma cutter that I made. It is about a year old and the first bearing failure. Luckily it was the easiest bearing on the whole machine to replace.

I made a similarly design router years ago and it rides on skate bearings with considerable preload on the gantry. I only use a single screw on X on that machine. The preload keeps it from racking. At the time, I bought 100 sealed bearings from Ebay for about $15.00. I use the heck out of that machine too, but yet have not seen any bearing failure there. In fact I took it apart a few years ago with the intention of replacing all the bearings. None were in bad shape at all, so I let them ride. Maybe those Chinese bearings are thicker skinned than the ones I got with the CNC router parts kit. Not real sure, but there is more pressure on my router than on my plasma for certain. 1 bearing failure out of about 50 in use in maybe 8 years is not so bad at all. Especial given the 25 cent replacement cost.
Lee
-
04-08-2014, 09:22 PM #123
Registered
- Join Date
- Jul 2013
- Posts
- 38
Re: Build thread: Mac's Momus X2S
Interesting page, you linked. It basically admits that the whole ABEC system doesn't apply to skating, which I completely agree with. You might contact the manufacturer and see what they say about using their bearings this way. Originally Posted by Mac.CNC
 No signature I would write will fit on only two lines.
-
05-01-2014, 04:25 AM #124
Registered
- Join Date
- Mar 2013
- Posts
- 209
Re: Build thread: Mac's Momus X2S
Hello again,
good news, I did a lot and haven't had any more bearings crack so far :-)
No broken bits either, quite yet - that's an acomplishment in itself I think.
Anyways, I finally decided to tackle the last todo part of the machine which was the operator panel.
I wanted that to be black on white, engraved, and have been looking for a while now to find that elusive engraving material that is black on top, but turns white as you cut through it.
It's called phenolitic or something like that and hard to come by, unless ordered from a specialty supplier, so I thought.
Long story short, for the past few months I kept looking at McMaster Carr for raw materials for this project, but could never find anything that would work.
The other day, I came across a thread on the cnc zone and someone recommended to look for the term "Engraving Plates"...
Turns out, McMaster has a relatively inexpensive selection of what I was looking for in a wide variety of color choices, you just have to look for the right term.
It was right there, all along, just a little hard to find. :-)
I ended up ordering two sheets of this: Plastic Engraving Plate, Adhesive Backed, 12" High, 24" Wide, Black with White Core
About $17 per sheet, it's a little thin for an operator panel in itself, so I laminated it against a piece of hardboard from Lowes before trying to engrave it.
The hardboard itself was slightly warped, which lead to uneven engraving - I wasn't so happy with it at first, but mounted it anyways - I'll just cut another one when the vacuum table I'm working on is ready... :-)
This is what the model looked like, I only had a few sections, most of the operations happen in Mach3.
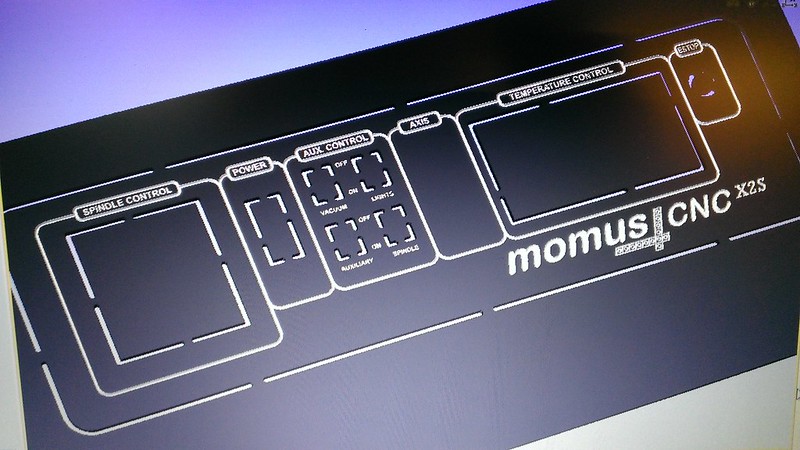
I had no referece for the momus logo itself, so I kinda made up my own :-)
For anyone that has been wondering about the X2S extension that's been on this thread since it's started:
X = Extended
2 = Version 2 + Twice as long
S = Special, higher
Sorry if that sounds snobby or anything I didn't mean to come over like that, was just making this up as I went :-)
Here's the sandwich in the machine:

It kept bowing up on me, so I tried to put some screws into it to hold it down (didn't actually work perfectly in the end)
After the engraving of the group outlines and the group labels, it's already evident that something is wrong:

Let's just cut it out for now and see what it looks like:

After cleaning it up and already knowing it wasn't perfect, I mounted it anyways just to see if the outer profile and inner pockets would work with the different components.


For completion, this is what the back of that panel looked like after installing it:

Althought not quite what I was hoping for in terms of precision in engraving large pieces like that, because of the inability to hold them flat (I need a vacuum table), it still turned out kind of ok I guess.
I'll just cut another skin for the panel when the time comes...
So far it's been good... No more cracked bearings and I'm still praying that there won't be anymore anytime soon.
Speaking of praying:
[url=https://flic.kr/p/nawT51]
(Albrecht Duerer's "Praying Hands" carved into a venered MDF core coffee table top picked up from a RE-store for $15)
Happy CNC'ing,
Mac
-
06-06-2014, 04:41 AM #125
Registered
- Join Date
- Mar 2013
- Posts
- 209
Re: Build thread: Mac's Momus X2S
Just a quick update, I've had no issues so far - no more bearings cracked and the machine has been running like clockwork so far.
I've probably done 50ish or so projects on it and had no issues at all.
This was all done with the riser table in place, last week I finally decided to take it out and explore how it would do without it (fully extended z-axis).
At the same time, I wanted to explore the possibility of having a slim line vacuum table in the machine.
I already know what high end-hp pumps cost ($$$), but then again perhaps by using zoning I could get away with something cheaper...
Stay tuned :-)
-
06-06-2014, 01:40 PM #126
Registered
- Join Date
- Dec 2012
- Posts
- 38
Re: Build thread: Mac's Momus X2S
You have been using your machine for quite a while now, is there anything you would build differently if you were to build another one? I am especially curious about the opening you built into the opening - have you used it? Perhaps for cutting dovetails?
If it weren't for the last minute nothing would ever get done.
Jim
-
06-06-2014, 06:42 PM #127
Registered
- Join Date
- Mar 2013
- Posts
- 209
Re: Build thread: Mac's Momus X2S
Yes, I have cut dovetails on it. There are some pictures on that topic in this thread a while back.
I haven't used the opening for a while though, there are just so many different aspects and techniques to explore, I haven't had a chance to come back to the dovetails yet.
Would I do anything different when building another one? Honestly, not much. I'd make it much wider perhaps ;-) That would mean a stronger gantry tube and a beefier z-axis, which is something mine could benefit from too. I found that without the shelf and the z extended, it's starting to vibrate a little when cutting faster than 90ipm with a 1/4" bit. I attribute that to twisting in the tube and perhaps flexing of the z-axis, but remember, mine is 3.5 inches higher overall than the original design.
Other than that, it's been fine so far. The Delta VFD and the air cooled Ugra spindle were the right choice, albeit costly and a bit noisy - I don't even hear it most of the time over the dust collector though.
The Kevlar reinforced belt drives have been working great also, no issues - even at that length, still no wear or stretch.
I do have to say that the left slave motor upgrade on the x-axis is almost a must and I would not even consider building another one without that upgrade (at any size, even smaller). That made a huge difference in the overall performance of the machine. The thrust bearing thing in the z-axis is also working great, I haven't had to go back and do anything or even tightening anything up - it just works.
--
Mac
-
06-06-2014, 08:38 PM #128
Registered
- Join Date
- Dec 2012
- Posts
- 38
Re: Build thread: Mac's Momus X2S
Thanks Mac. I knew You had done some dovetails early on - I didn't know if you had done more but not posted anything. I have read a few threads on here where the builder is thinking about dovetails by go to the max on the x axis because their machine has no opening. Either way, I am wondering how to securely clamp the board as well as backer boards to prevent tear out. Perhaps I would be able to use the clamping mechanism from my Delta dovetail jig or build a scaled down version.
When I started collecting parts, I wasn't thinking of being able to dovetails but after seeing your machine as well as the software ger21 has been working on I have been thinking this would be boatload better than even a dovetail jig and a handheld router.If it weren't for the last minute nothing would ever get done.
Jim
-
06-06-2014, 09:43 PM #129
Registered
- Join Date
- Mar 2013
- Posts
- 209
Re: Build thread: Mac's Momus X2S
Using a clamping mechanism similar to your dovetail jig would be a good idea, why reinvent the wheel?
Now that the shelf is out of the machine, I have no way of clamping vertically anymore, so I'm going to have to come up with something like this too.
I have a few ideas already involving a wide 90 degree bracket that is itself bolted on top of the spoil board when in use.
One big concern is setup time, so I don't want to have to make major changes to the machine each time it needs to go in and come back out.
I will definitely incorporate a backer board, now that I've seen the tear-out when not using one...
--
Mac
-
06-12-2014, 05:46 AM #130
Registered
- Join Date
- Mar 2013
- Posts
- 209
Re: Build thread: Mac's Momus X2S
So - while having used the machine for a while (or any CNC at that) I ran into several issues with my riser approach, namely having not enough travel in the Z.
I thought about that for weeks, but at some point I wanted to know what would happen if the Z would actually cut at lower extensions of itself....
I took the shelf out and started to think about what the next logical step was, to stack stuff up to get back to a workable bed in this machine.
Trust me, these deliberations weren't easy - I went in 0.75" increments thinking about it even and also the fact that MDF tends to creep/breath in thickness, depending on humidity.
Another thing I wanted to get into is a zero tolerance spoil board. I've been cutting things for a while now, on a plywood surface that I wouldn't even call a spoilboard because I never really surfaced it.
The projects I've done so far (except for the PCB thing) never called for that and boy - I had no clue how off my bed was, once it came to that... wow
That had probably something to do with the me and the loose x-rails earlier on and then me again, replacing bearings while taking the y-rail almost completely off the gantry.
Anyways, I took the riser out and started to think about something new. The main thoughts were:
- Vacuum Table, yay!!
- Get away from the t-rail clamping, takes way too long - find a more efficient method
- Get away from wood screws going into the spoil board to hold down projects, that keeps stripping and messes with the vacuum.
- Zero tolerance spoil board approach!
You may be wondering what this zero tolerance spoil board thing is I'm talking about...
I only saw this recently on youtube, this is when you have a way z-reference your cutting bit each time you have a tool change to the top of the spoilboard within about +-3 thousands or even less.
Some of you may be able to do that by using paper each time, but more than often I found that I was quite off once in a while and cut some nasty stuff into the spoilboard earlier.
Now that I have the fixed touch off pod going, sitting firmly in the machine - I'm using that now each time to referece the tool in relation to the workpiece - achiving no penetration to the spoilboard, but still getting through cuts on the workpiece.
That took a few changes to Mach3 screen to be honest and some scripting to make it work, but hit me up on that if interested.
Next up was the mini vacuum table.
After I took the riser out, I thought about how to get back up there, but still didn't want to make it too high.
I still have the original under plywood plate with one layer of t-tracks and MDF tiles in the bed, so I started to build on top of that.
First I thought about the mounting methods for workpieces.
I grew to not like the t-track thing anymore, because it's restrictive and requires some pretty creative contraptions sometimes to hold things down.
I don't know what it was, but after a long time, I fell in love with the T-Nut approach, there's video's about it - go look at it.
As for the grid spacing, I went back and forth at first - 2 inches? 1.5 inches? perhaps save some nuts by making it wider??
After playig with that for a while in Sketchup, I decided to just do the right thing in my mind: 1" grid spacing.
The problem was that at that grid spacing, it would require 705 t-nuts to cover my entire cutting area.
Well, this is NUTS! i thought. At about almost $40 a bag for 100 nuts (boltdepot), I'd be in the hole for a while... NUTS, I tell ya!
I'm not gona say how many NUTS i bought in the end, but one can strategcally place the NUTS too, so you don't have to go all out NUTS ;-)
TOTALLY NUTS!
I'm not betting any n... on this yet, but I thought it might be a good idea to start experimenting with a plenum for the vac table at this point - while waiting for the NUTS to be delivered.
So I came up with this:
 WP_20140602_002 by mkloberg, on Flickr
This is basically a lower plenum that tries to support each flange of every nut in the arragement from the bottom, so that it can't fall out (to the bottom).
In other words, the t-nuts act as the suctio holes for the vacuum table without getting sucked into the table.
I also divided the table into 5 zones and isolated the t-slot mounting bolts to the underlaying (original momus t-slot) structure with c-bores.
You have to remember that this is still MDF, so I put several liberal coats of 50/50 mix zinser sealcoat and alcohol into the plenum, to seal it up tight.
That was easy. Making the upper part was not so... I mean the program to cut the holes and recesses only ran for a couply of hours, but banging in the 100's of t-nuts was a chore that to so long, I wouldn't wish that task to my worst enemy.
In the end it got done, and it was very heavy!!! plate got joined with the plenum.
I spent two whole evenings banging those t-nuts in, and it wasn't fun ;-)
 WP_20140604_002 by mkloberg, on Flickr
 WP_20140602_003 by mkloberg, on Flickr
 WP_20140604_001 by mkloberg, on Flickr
Shesh...
After joing the two plates I surfaced it all as best as I could:
 WP_20140605_001 by mkloberg, on Flickr
I have to admit that this was a lot of work, but it's now super easy to make modular jigs on a 1x1 grid pattern or to just hold down stuff without having to drill holes into the workieces:
 WP_20140602_007 by mkloberg, on Flickr
While trying to get this zero tolerance spoilboard thing to work, I turned into 3D thin plywood model makeing for a while, just to get a feeling for it.
I just thought that this is where the accuracy of the spoilboard would rear its ugly head the most... and it did.
That's a pretty interesting thing to do and I can only recommend that to anybody that wants to learn about advanced spoilboarding (as in NOT to cut into it, lol)
I bought a few plans now from makecnc.com and was astounded by the accuracy and detail of the plans in general - thay even give you assembly instructions for each project.
Super awesome, very high quality stuff and easy to work with (+++ is that they will give you both imperial and metric plans!).
The bit I used for this was a Freud 1/16th double flute straight (04-096), despite that - I still had issues with parts getting pulled out and sucked up into the dust collection (SHREDDER), but that's onther story.
I played a little with tabs and onion skinning to stop that from happening and got a fairly good result in the end.
 WP_20140609_004 by mkloberg, on Flickr
 WP_20140609_005 by mkloberg, on Flickr
I cut a Lion and an Anglefish (from makecnc mentioned earlier, the cut files were 5 bucks each):
 WP_20140611_009 by mkloberg, on Flickr
 WP_20140611_002 by mkloberg, on Flickr
I did a lot of projects lately, one of the more intersting ones involved a gun collector that wanted a structural mounting bracket for a bookshelf, the bracket being a gun itself.
I found a super detailed CAD model of a 9mm Beretta on grabcad and was able to carve it on the momus (two halves out of Lowes 3/4 poplar, glued together after the cut):
 WP_20140611_006 by mkloberg, on Flickr
Problem was that it took very long. Using a Amana 1/16 Ballpoint Taper for the details, it took about 4 hours total to carve the two pieces to make up one gun. The letter engravings on the side of the gun got somewhat lost in the carving itself, so I ended up v-carving the rest into the workpiece to give it some extra detail:
 WP_20140611_007 by mkloberg, on Flickr
I wonder what that'll look like with some Rustoleom Metallic Paint on it, hehe... ;-)
Getting ready for Axis No.4
Happy CNC'ing,
--
Mac
-
06-28-2014, 06:59 AM #131
Registered
- Join Date
- Mar 2013
- Posts
- 209
Re: Build thread: Mac's Momus X2S
Hello again,
I've been thinking about this step for a while, but it's probably the right thing to do, looking at it from several angles.
Looking at the responses from the past few posts (none) it occurred to me that I'm probably talking to the wrong audience by now.
I know that for a fact, because seeing other successful builder make cool stuff while I still have stepper motors and rolls of cables on the bench isn't exactly that enjoing.
Anyways, my machine is still running, not more cracked bearings so far.
For what it's worth, I've decided to blog a little more elsewhere about the "make & sell" part of it all, instead of the "build the machine" part.
The new blog I've set up will be here, mainly focusing on the stuff that comes out of the machine/not so much on the machine itself (products):
BlogSpot/Blogger: MacDotCNC
Perhaps I'll see you over there, and that doesn't mean I won't come back either. The 4th axis thing is still looming and once that starts, I'll be right here again to document the build.
--
Cheers,
Mac
-
06-28-2014, 09:51 AM #132
Registered
- Join Date
- May 2006
- Posts
- 9
Re: Build thread: Mac's Momus X2S
Dear Mac
Things develop and you are right that it is not so much about Building but more about using the CNC machine. This in facts, doesn't mean it is less interesting to follow your posts and great pictures (very sharp and detailed).
I will for sure follow your blog at your new site, and hope you will continue to write as much as you get time to. Continue your great work. It is very inspiring.
Cheers from Denmark
MogensA person from Denmark, who is ongoing to built a homemade and homedesigned CNC Router.
Looking here for inspirations and ideas.
-
06-28-2014, 03:09 PM #133
Community Moderator
- Join Date
- Mar 2003
- Posts
- 35538
Re: Build thread: Mac's Momus X2S
Just because you don't see many responses, doesn't mean that no one's watching. Imo, this is one of the better threads here, and I read every post in it.
Gerry
UCCNC 2017 Screenset
http://www.thecncwoodworker.com/2017.html
Mach3 2010 Screenset
http://www.thecncwoodworker.com/2010.html
JointCAM - CNC Dovetails & Box Joints
http://www.g-forcecnc.com/jointcam.html
(Note: The opinions expressed in this post are my own and are not necessarily those of CNCzone and its management)
-
06-28-2014, 03:24 PM #134
Registered
- Join Date
- Dec 2012
- Posts
- 38
Re: Build thread: Mac's Momus X2S
X2 on what Gerry said. Since I have YET to get started on my Momus I have gone back and re-read many of your build posts. I will be following your blog as well.
If it weren't for the last minute nothing would ever get done.
Jim
-
06-29-2014, 04:17 AM #135
Registered
- Join Date
- Dec 2012
- Posts
- 38
Re: Build thread: Mac's Momus X2S
FYI Mac, I tried to post a comment on your blog this morning about your ceiling medallion, looked like it worked, but I see the comment never showed up on your blog. If I can recall what all I said I will give it another try. :-)
If it weren't for the last minute nothing would ever get done.
Jim
-
06-29-2014, 06:18 AM #136
Registered
- Join Date
- Mar 2013
- Posts
- 209
Re: Build thread: Mac's Momus X2S
Hi Jim,
thanks for trying to leave a comment :-)
I just looked and there was nothing to approve, I've never ran a blog before - but found a setting that wouldn't allow anyone to comment.
I've lifted that restriction and hopefully anybody will now be able to commend on the blog posts.
Thanks again for pointing out that this part of the blog wasn't quite working yet. :-)))
Please try it again...
Cheers,
Mac
-
06-29-2014, 06:28 AM #137
Registered
- Join Date
- Mar 2013
- Posts
- 209
Re: Build thread: Mac's Momus X2S
Thank you, Gerry!
That coming from you means a lot to me (again, hehe) :-)
I promise that I won't be a stranger around here, there's still a ton of stuff in my head I want to eventually do to the machine and I'll keep this thread alive with those modifications.
I just needed a more public outlet to get the "make" business going...
Cheers,
Mac
-
06-29-2014, 05:13 PM #138
Registered
- Join Date
- Dec 2005
- Posts
- 17
Re: Build thread: Mac's Momus X2S
Hello,
Just a thank you for sharing all this wonderful information. I just reread this again for the third time. I'm a bit thick headed so it takes awhile for things to assimilate into usable bits!!
I built a version 2 of the Momus some time ago and though it started out just fine the longer I used it the more time I was trying to keep things aligned for repeatable parts making. After disassembling reassembling and many hours of tinkering with no positive results I disassembled the entire assembly put it into a box and relocated to another state. We're somewhat settled in now so I'm going to basically take it all apart and insure I haven't made a mistake somewhere in my build. I can honestly say that your build has been a real inspiration to raise the level of my build to higher standards. Then it will be a success.
Your observation of adding the "extra motor" to the X axis is a must do, this was a major contributor to the problems I was experiencing. Now to engineer a way to accomplish this without major re-skinning! Enough of my rambling.
Regards,
Lee
-
07-09-2014, 04:13 AM #139
Registered
- Join Date
- Mar 2013
- Posts
- 209
Re: Build thread: Mac's Momus X2S
Thanks Lee :-)
+1, once again for the slave motor upgrade on the X, best thing I ever did to my machine.
Don't get this the wrong way, it's fine with only one X motor, but you have to really know what you're doing - take light cuts and have the feeds and speeds just right, then it'll run just fine.
If one is a beginner cnc machinist, like me, just butchering some wood or MDF at first - it'll be difficult to archive repeatable cuts with just one stepper motor.
I've found that over time, the more one understands what a cutting bit does, understands feed rates, chip load and RPM, up and down cuts and the difference between climb and conventional milling - there is very little wrong with having just the one motor on one side of the X. Unfortunately, once you've built the machine - you're most likely not in that position and will just turn on the router and run your g-code without knowing any of the tricky details, which will then cause the gantry to deflect in either direction, giving not so great results sometimes... The second x axis motor kind of "buffers" the user from all that and allows for more aggressive cuts while maintaining the overall stability of the gantry.
Sorry, got a little carried away again on this topic - what I actually wanted to write about today is the 4th axis I'm going to implement on the Momus..
For a few months, I've researched this all over the forums, there is not all that much out there. Software for making 4th axis g-code is expensive too.
E-bay had for a while now lots of these units, mostly Chinese made but what was holding me back was the issue with the backlash.
There are basically four different designs out there for something like this:
- Direct drive (I think that's crap, because the stepper will never have enough holding power to resist lets say a 0.25 downcut endmill. Same with upcut mills, I think that will always give away, loosing steps just not work right. Totally stay away from these if you want my (totally inexperienced 4th axis) opinion.
- Belt driven (I think that's probably a good choice, as long as the ratio is more than a 1:5 transmission)
- Harmonic drive (no backlash but expensive - then, with all the crap going on inside a harmonic transmission - how long is that going to last?). The other problem I had with those is that they usually come with 1:50 or 1:100 transmission ratios. Think about it, that'll take forever to flip a part 180 degrees over, etc.
If you don't know how a harmonic transmission works, watch this (made out of Lego, super fascinating): https://www.youtube.com/watch?v=ZSSH-YfKg6I&feature=kp
- Worm drive: That seems to be what the big boys are selling these days (Tormac, etc) - I still don't like it, there's inherent backlash still in these and requires fiddling around frequently. Just wear and tear...
Of all these choices I liked the belt drive variety the most, the ratio seems ok, no fancy transmission box to deal with, enough holding power - so I've been looking for the past few months - mostly on e-bay.
The other thing I wanted was a 4 jaw chuck on it, I'm sort of used to that from my HF mini mill - this lends to woodworking better than a 3 jaw - the workpieces are just easier to prep with a 4 jaw.
I've had my eye set on a Chinese model for a while, but wasn't sure about that so much - knowing it might take a couple of weeks to deliver. Having done something similar before, that was a turn off.
A few weeks ago, this other model showed up (there were only a few available) - it's still a mystery to me on who actually makes them (the packing slip said IMService we are THE source for low cost Cad-Cam and Desktop CNC Mills, lathes, and Routers on it).
Reading through the description, I immediately loved this thing, it's got like all the features I could possibly want - including a quick change collet spanner in the back (which lends itself to my production line idea), so I finally caved in and bought it ($380).
It arrived today, so here it is right out of the box:
 WP_20140708_009 by mkloberg, on Flickr
It came with the motor (don't take that for granted on the Chinese ones), a spanner, a 5C collet nut and the quick change 5C nut/lever:
 WP_20140708_008 by mkloberg, on Flickr
Now I'm happy that I raised the momus by 3.5" originally in this build, because the whole thing fits just under the spindle with a 2.5" long tool in the chuck. Juuust enough clearance to not touch the grease nipple that protrudes out of the top of the unit, as if that matters :-)
 WP_20140708_011 by mkloberg, on Flickr
I still have to find a matching tail stock for it (center height is about 2 3/8").
Any ideas?
Then I have to come up with a removable rail mounting system for the both, too.
The other thing I have to find is a 4 jaw chuck, that goes into a 5C collet - I know they are out there - just have to find one ;-
Next up is how to control this thing.
One problem I'm having right now that I've been using a Gecko G540 for this machine (with Smoothstepper).
I've already used up all the available stepper ports on this controller, due to the X-slave motor, so I can't really control this additional axis.
I have 3 simulated parallel ports coming out of the smooth stepper, two are taken - one by the G540 and one by an IO board.
I was thinking about getting one of these and putting it on the 3rd port:
http://www.geckodrive.com/geckodrive...ves/g201x.html
But then a friend suggested, why not get another G540, plug that right into it and have the other 3 ports available in case a driver blows up in the main G540...?
What do you think?
--
Mac
-
07-09-2014, 05:00 AM #140
Registered
- Join Date
- Jun 2013
- Posts
- 1041
Re: Build thread: Mac's Momus X2S
Here's one for you. shars.com - 4quot 4 Jaw Independent Precision Chuck amp 5C Arbor
Ben
Sent from my HTC6435LVW using Tapatalk

 Reply With Quote
Similar Threads
-
New Momus Build
By Jkountz in forum Momus Design CNC plansReplies: 80Last Post: 04-04-2014, 11:24 AM -
404's Momus V2.0 build
By e404_forbidden in forum Momus Design CNC plansReplies: 13Last Post: 09-22-2013, 02:49 PM -
Sven's modified Momus build thread
By svenw in forum Momus Design CNC plansReplies: 7Last Post: 11-27-2012, 06:24 AM -
Rob's Momus Build
By rwhittle in forum Momus Design CNC plansReplies: 8Last Post: 04-08-2012, 08:41 PM -
My Momus build
By TeslaFreakshow in forum Momus Design CNC plansReplies: 29Last Post: 12-06-2011, 11:35 PM
