


Well let’s see. It’s been since 2005 (when I bought the mill) that I have worked on it. Actually some work in 2006 too.
I bought the mill new from Enco in 2005. Free shipping and at a deep discount during their 20% off sale. I originally bought it to use as a drill press for the most part and NOT to convert to CNC. I already had too many projects and this was not supposed to be one more. But as is usual for me it turned into a project.
I looked high and low, did a lot of reading and decided to swap the cranks for motors and do a full on CNC conversion. I saw some great machines out there, there were not as many builds as there are now and sure enough got the bug!!!
I need to preface. This might be considered an Industrial Hobbies build but I think I’ll keep it here because when I started it there was no sub forum for the IH machines. AND. I don’t have an IHs machine so it might not fit in. I spoke with Aaron Moss many times over a year and gained some great knowledge before he changed professions. IMO, great guy.
I bought his conversion kit in 2005 also. It was a well-planned kit he sold and fit within my budget.
So now fast forward to now (2013) and I’m getting back to the build. I dropped the ball somewhere around 2007 when I was involved with an even longer (1995) car project. The car had some money in it and I needed to secure the car so it would not just be left by the wayside. The car is not done but road ready. I can drive it so off to the races I go. NO!! Not car races, I don’t race carsThe CNC conversion race to get her done and making chips before I move on to the other project in my home garage.
So here we go folks. It might seem like it’s all over the place. The reason why is I actually did some work in 2005 and 2006 so I want to show some old stuff along with the new stuff at the same time. In the end I hope to show the entire process.
It will be a picture loaded build cause I personally love the pics you guys post and I think most folks like a pic story along with my seemingly never ending talk LOL Yeah, I’m kinda wordy. Hope them dog gone moderators don’t shut me down fer talking too much.
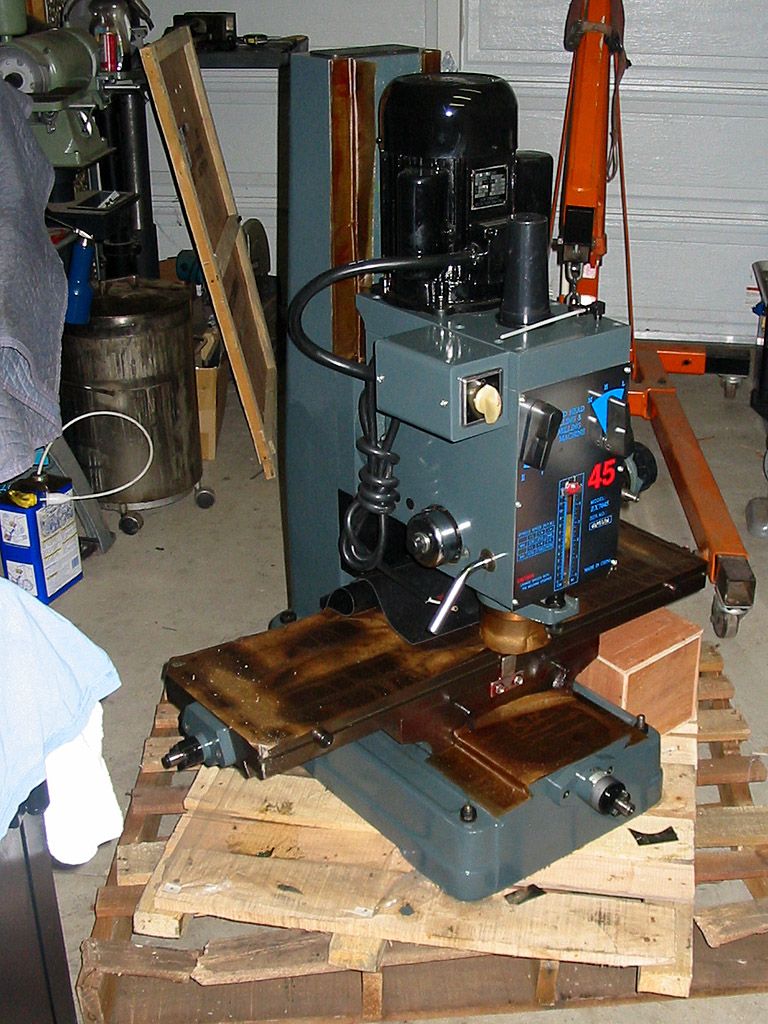
First pic. The day the mill arrived. Again, free shipping. I think I paid 1700 bucks for it. I have the receipt, I should make sure. That’s oiled paper on the table and machined surfaces. Didn’t help, there was rust. I’ll show that and how easily it came off.
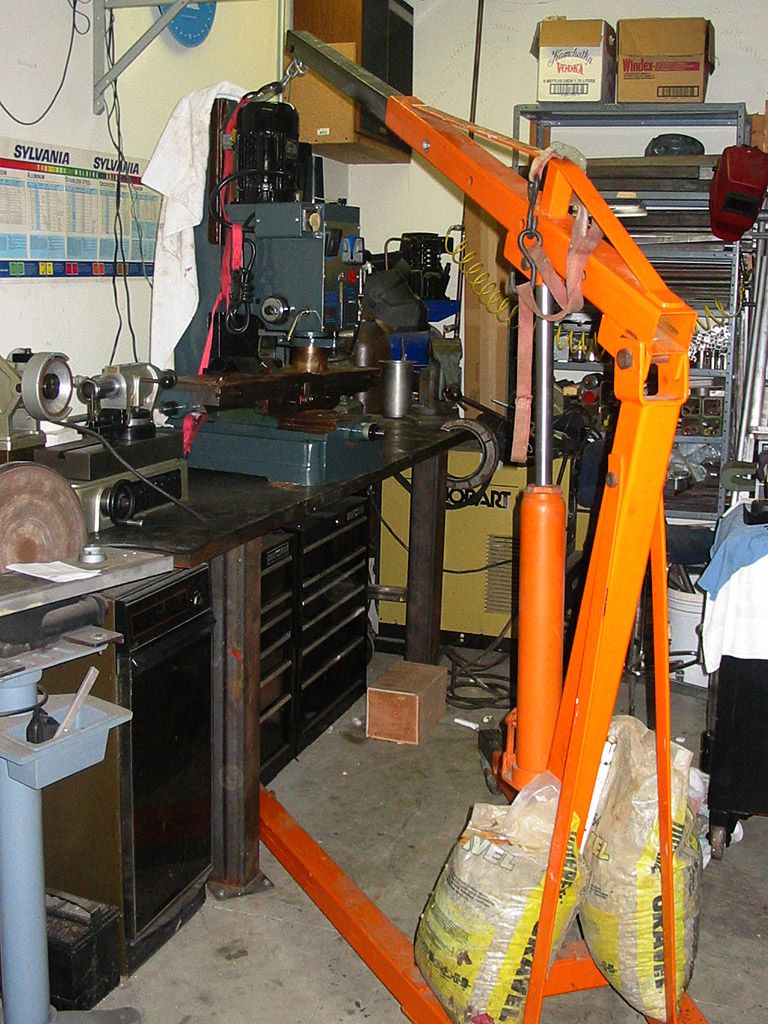
Lifting the mill onto my work table. That lil slug was heavy. I had to modify my engine lift (cherry picker with bags of rock) to get the reach I needed.
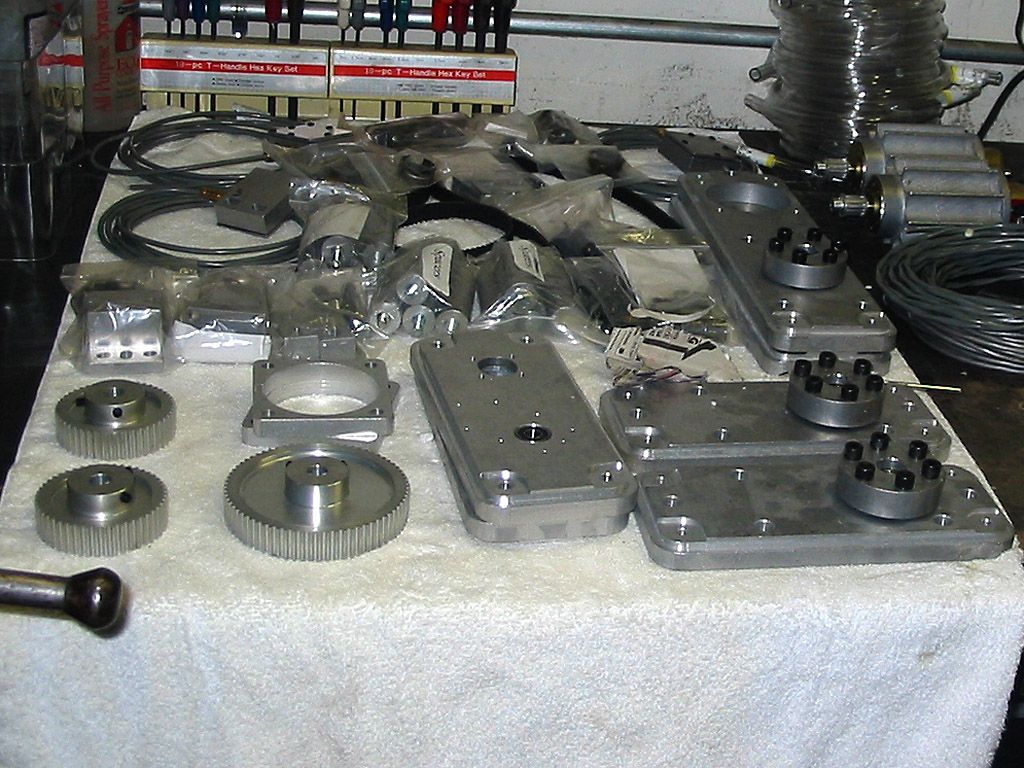
Here is a shot of the IHs stuff. Nice stuff..

Results 1 to 20 of 64
Hybrid View
-
04-04-2013, 05:25 AM #1
 Community Moderator
- Join Date
- Aug 2004
- Posts
- 115
Enco square column (RF-45 clone) CNC build.
(Note: The opinions expressed in this post are my own and are not necessarily those of CNCzone and its management)
-
04-04-2013, 05:27 AM #2
Community Moderator
- Join Date
- Aug 2004
- Posts
- 115
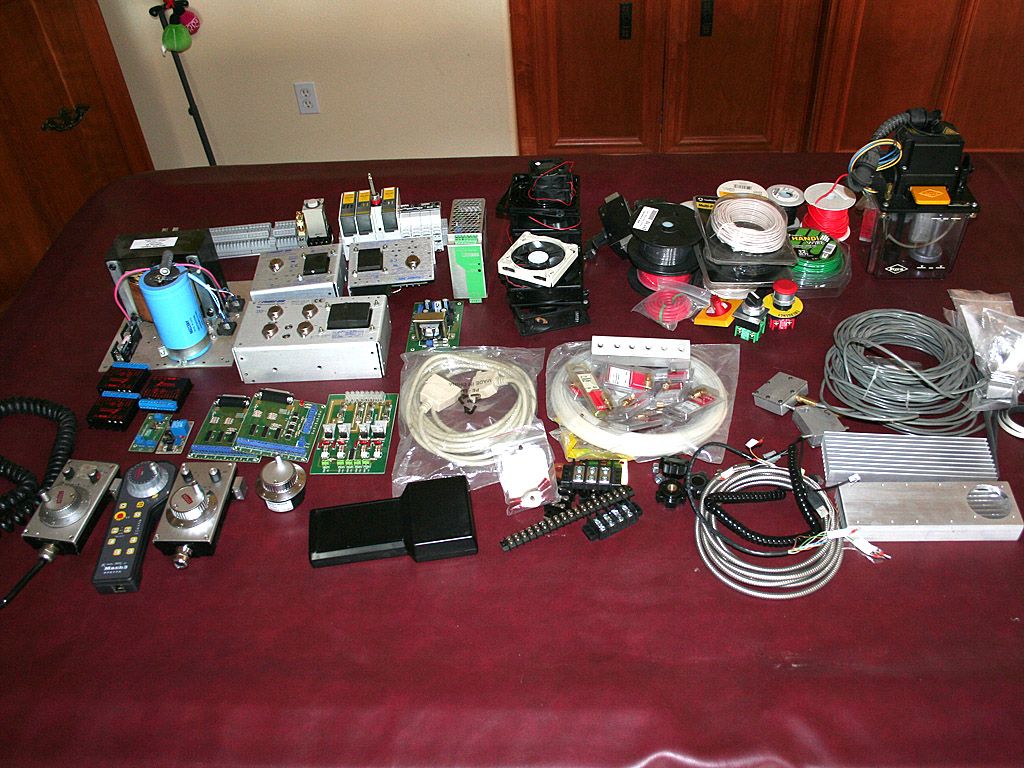
Those were pics from 2005. Fast forward to now and I have a Hoffman electrical box I will use for the electrics.
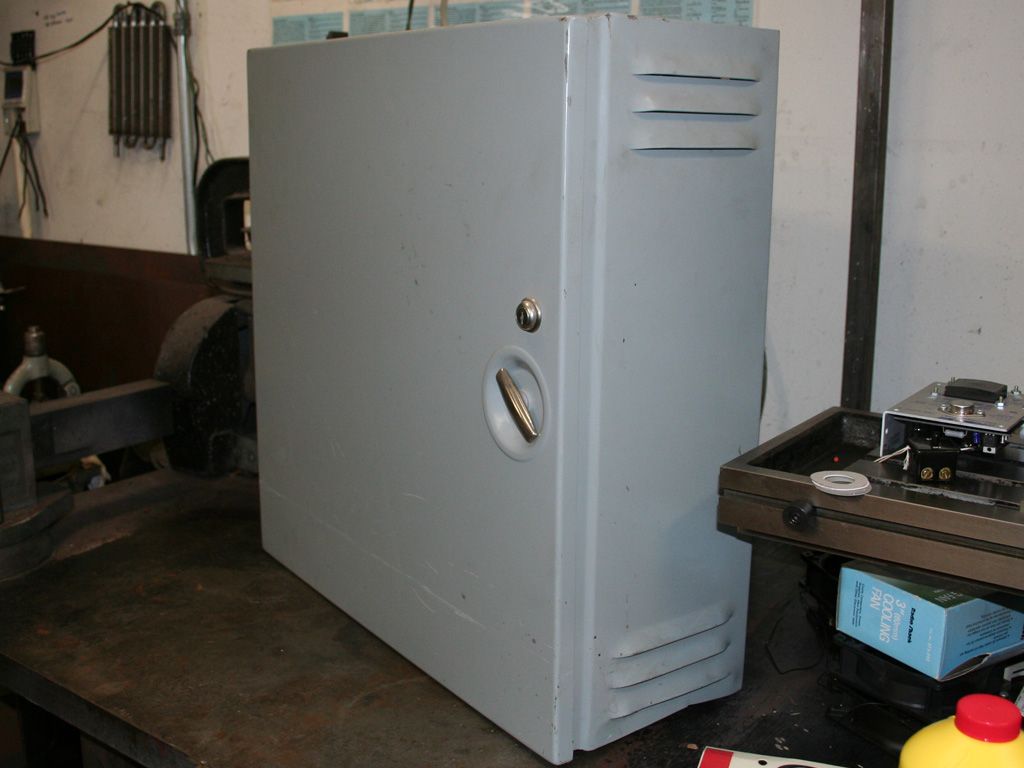
It’s a nice 24"x 24"x 8" box with a sub panel for mounting the goods.
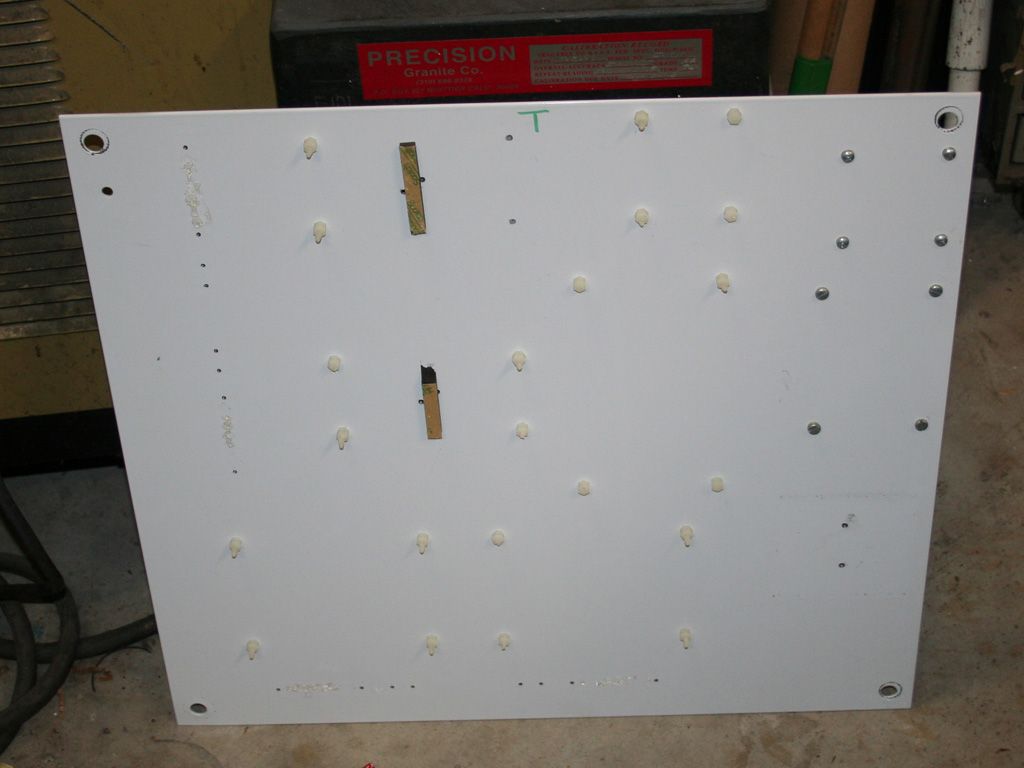
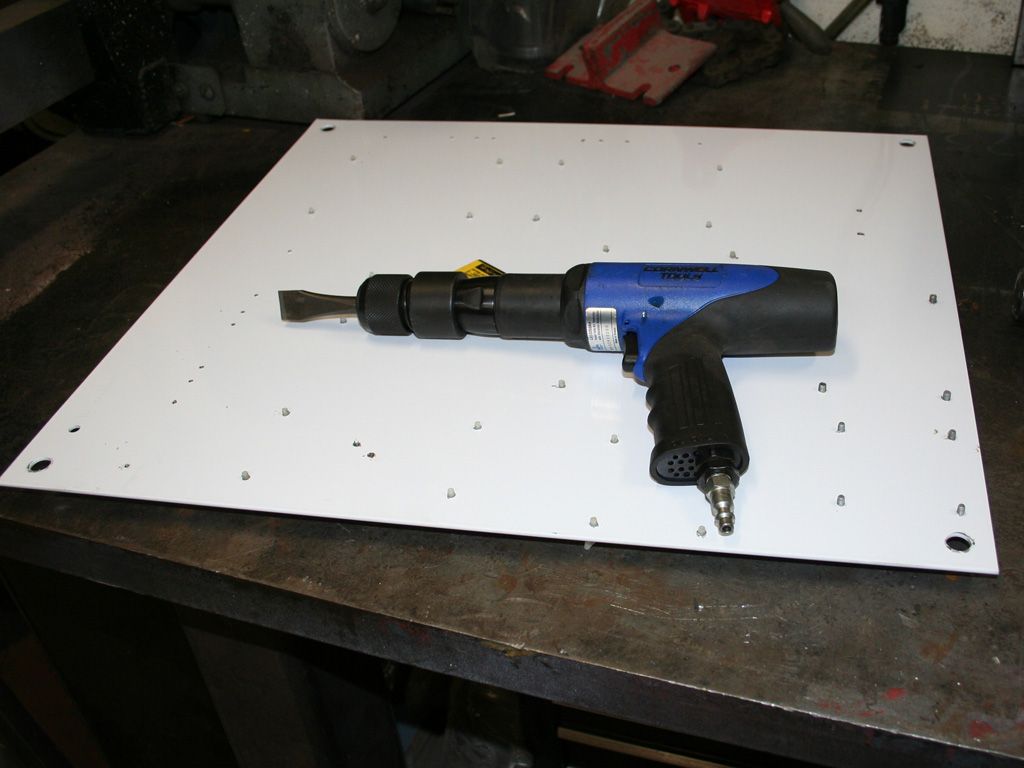
It was a used box that had a lot of plastic anchors attached. They were not easy to remove. I decided to chisel them off. I used an air hammer with a bit that I ground sharp. It removed all of them (about 50) in a minute.
Next was lining up the parts that I wanted to use and see what was gonna be the best arrangement. That's still going on.
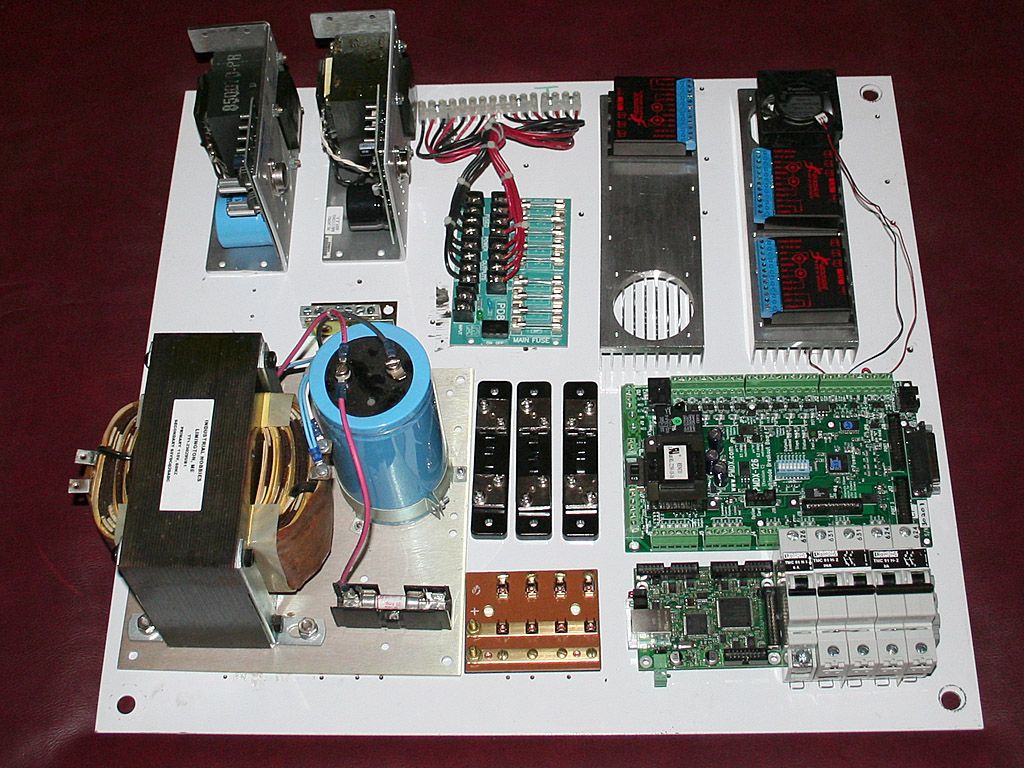
This last week I did buy some electronics. I bought some electronics back in 2006 from CNC4PC. A breakout board, power supply, relay board and a dump board. MAN!! Have they come a long way. I should show a pic or two of the old stuff. It’s?? Umm? Old is all.
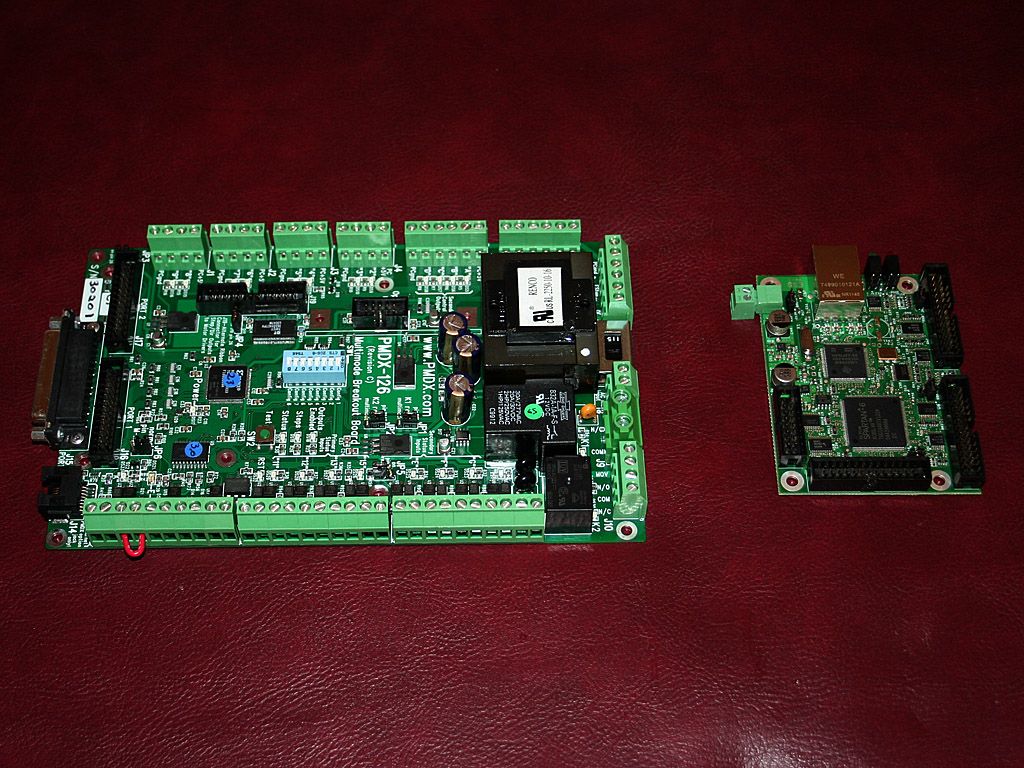
I ended up going with a Warp9 Ethernet Smooth Stepper (aka ESS) and a PMDX-126 breakout board. I think it’s the best setup for Mach.
So anyway. Much more to come. YES!! The hardware is in place on the mill (happened in 2005-2006) and I’ll show all the pics I have.
For now that’s it. Waiting on parts for the control cabinet. JR(Note: The opinions expressed in this post are my own and are not necessarily those of CNCzone and its management)
-
04-04-2013, 09:09 AM #3
Registered
- Join Date
- Oct 2006
- Posts
- 210
That is a big pile of parts. I love it when you can start on a project like this and not have to scour the internet for parts along the way. Those are some pretty awesome looking X/Y servos. What is the story on those?
-
04-05-2013, 07:03 AM #4
Community Moderator
- Join Date
- Aug 2004
- Posts
- 115
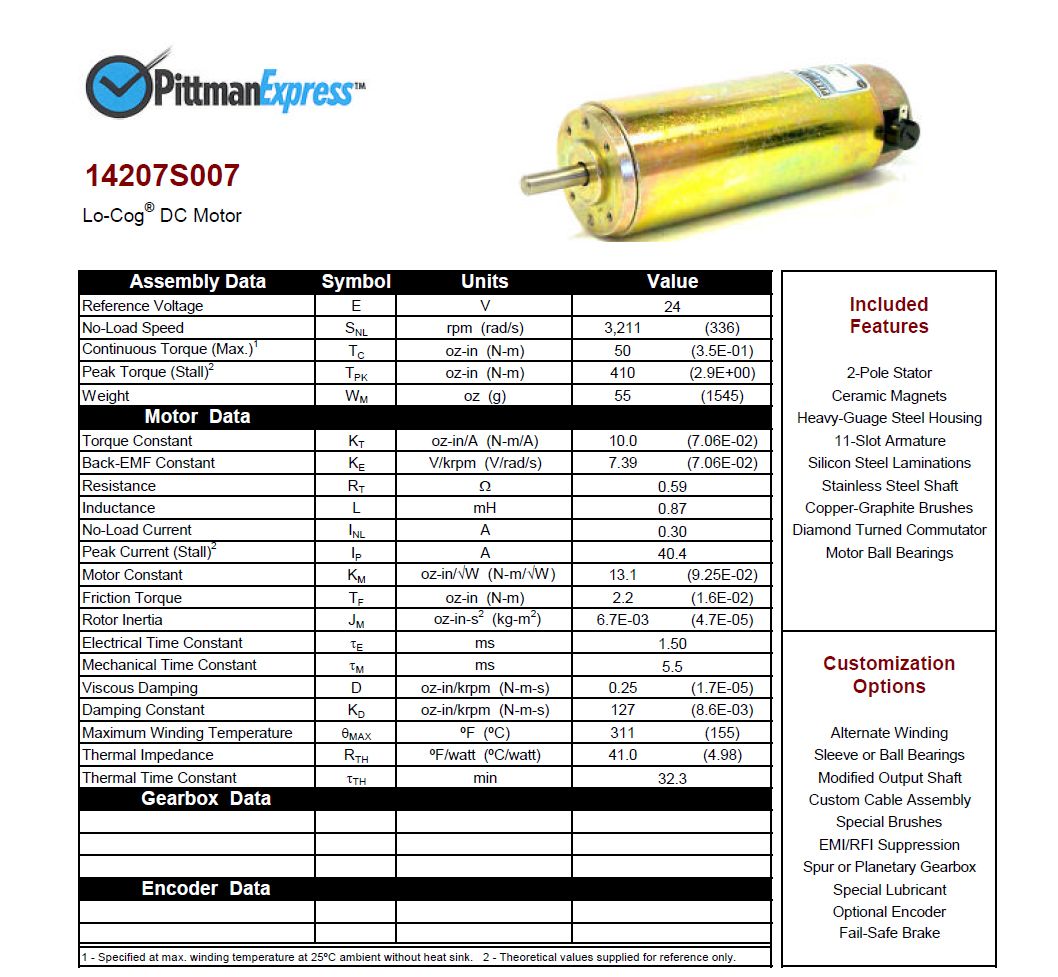
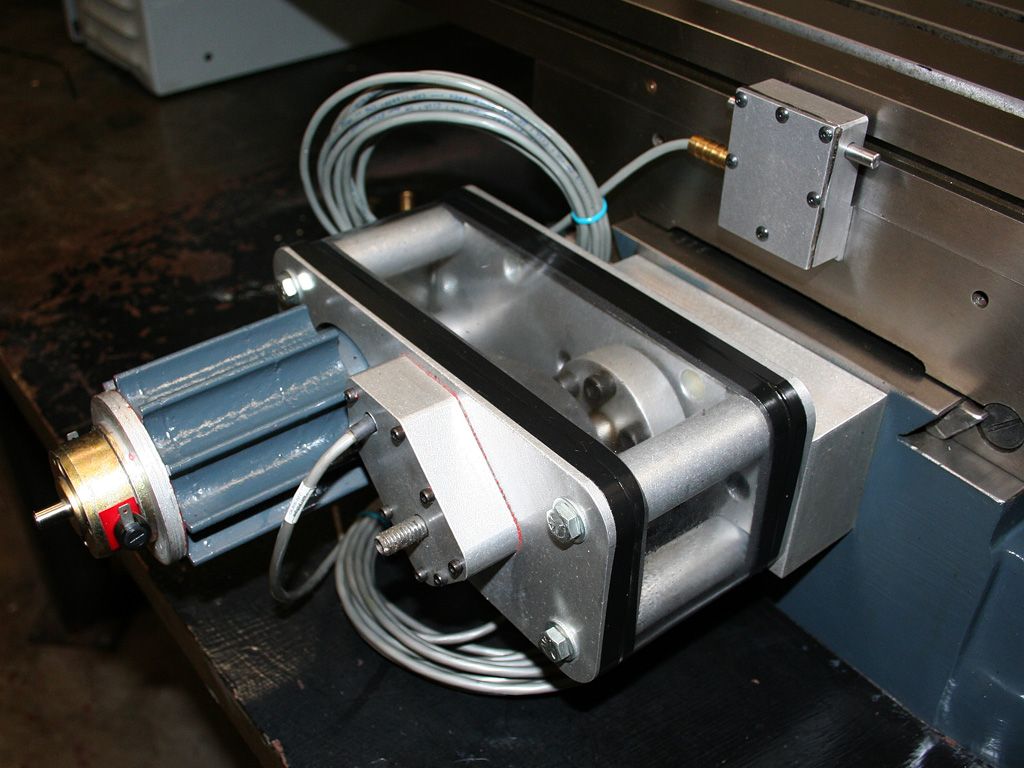
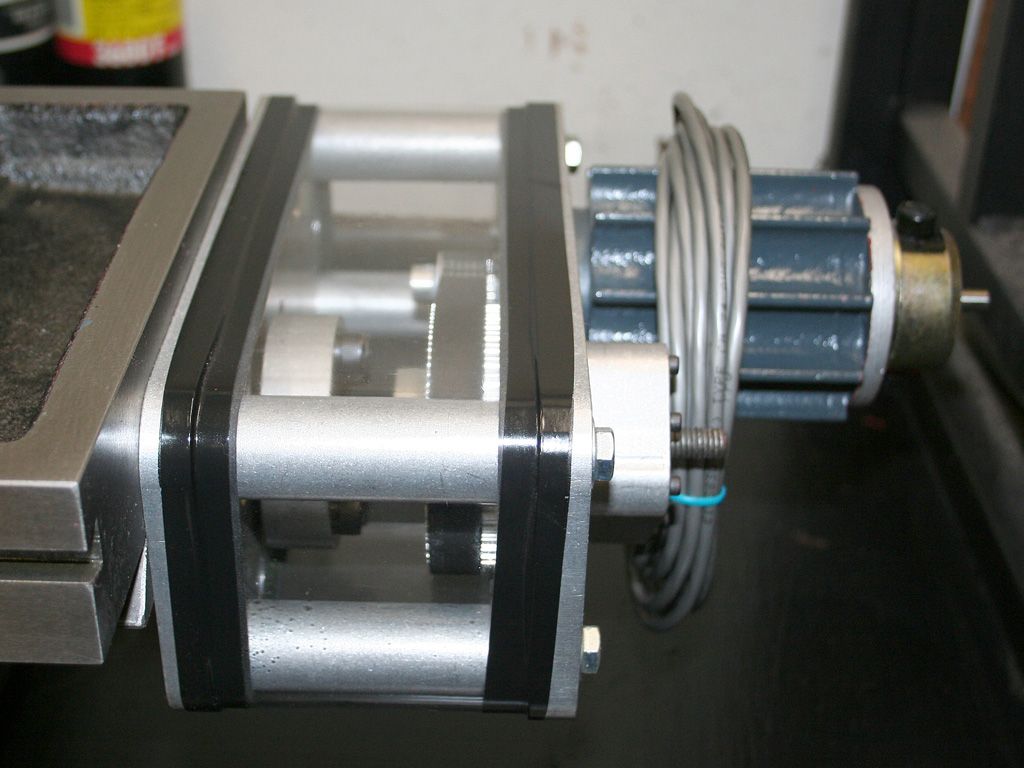
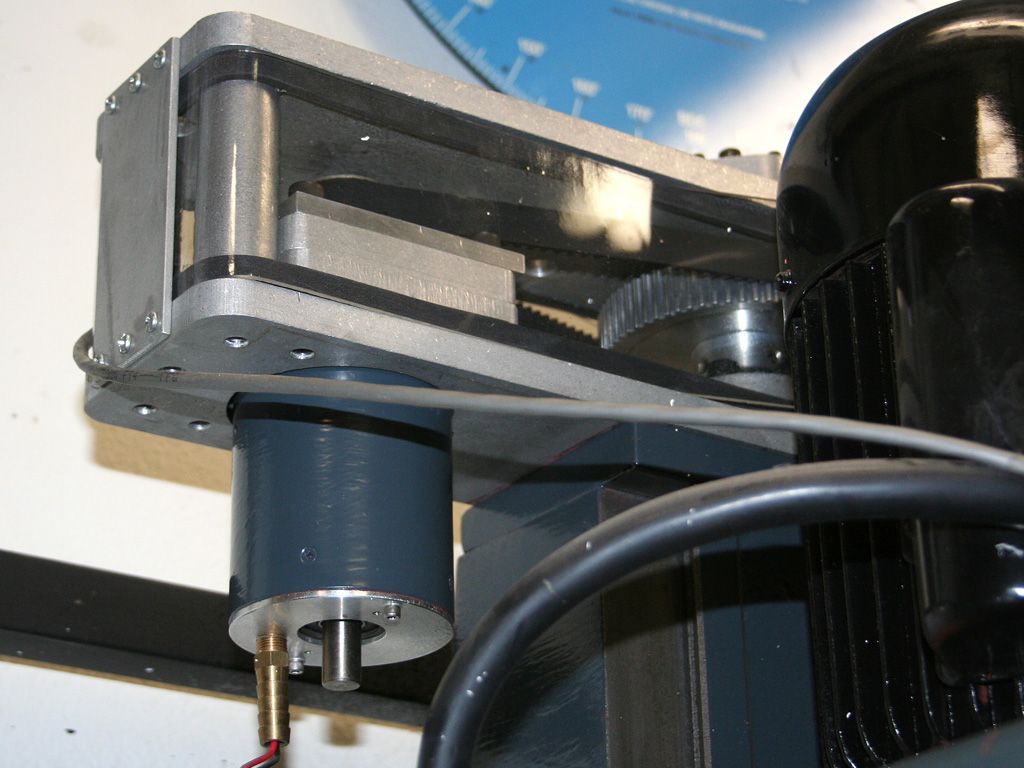
The motors are what Industrial Hobbies sold when Aaron was the owner. They are some decent, if not pricey Pittman NEMA 23 motors. The heat sink is what Aaron came up with and its not unlike what is on my Bridgeport for the steppers. Originally Posted by Winnfield

And yes. A 23 nema motor does sound a lil small for the 45 table but its not. Remember the nema number is for several dimensions one being the face mounting size. So yes. Its a 23 but its also pretty long for a 23. And with the gearing its plenty of power to drive the table and if inclined break a 1/2" end mill if the situation pops up. JR
(Note: The opinions expressed in this post are my own and are not necessarily those of CNCzone and its management)
JR
(Note: The opinions expressed in this post are my own and are not necessarily those of CNCzone and its management)
-
04-20-2013, 03:41 AM #5
Community Moderator
- Join Date
- Aug 2004
- Posts
- 115
Here is the info on the X/Y motors. JR Originally Posted by Winnfield
 (Note: The opinions expressed in this post are my own and are not necessarily those of CNCzone and its management)
-
04-04-2013, 02:08 PM #6
Registered
- Join Date
- Apr 2005
- Posts
- 1268
Wow, you've spent a long time on this conversion! But not to worry! In this arena, "Home CNC" that is, well, I've found it's a job that never ends!!!! Always a mod or repair needed so take your time!
Gonna be a nice machine though. I also opted to change my system to PMDX and Smoothstepper. Never looked back.
Nice pix and keep them coming.
Billbillyjack
Helicopter def. = Bunch of spare parts flying in close formation! USAF 1974 ;>)
-
04-05-2013, 07:25 AM #7
Community Moderator
- Join Date
- Aug 2004
- Posts
- 115
You are correct Bill. Home CNC is ALL Im about. I also get the folks that have to get things up and running. Me? No hurry, so it seems. Hmm? The PMDX and ESS? I think its the best interface for Mach at this point. Originally Posted by bill south
BUT?? I also think Mach with the simplest of breakout boards and a parallel cable running from the computer ALSO works just fine for many systems. Many systems. After all, thats what Mach was supposed to be. And inexpensive solution for folks wanting to get into the CNC part of their craft. Wood, plastic or metal. So with that I say anyone wanting to mess with CNC controls should NOT be intimidated with ALL the advances re: various interfaces. A simple parallel cable (printer cable) and a basic breakout board can control ANY 3 axis machine. I love the sport of electronics and metal working. Thanks to the folks out there, now we can play with our machines. JR(Note: The opinions expressed in this post are my own and are not necessarily those of CNCzone and its management)
-
04-04-2013, 02:24 PM #8
Member
- Join Date
- Apr 2006
- Posts
- 8159
Might be the longest build on record here on the zone.
Keep at it, looking forward to your progress.
Hosshttp://www.hossmachine.info - Gosh, you've... really got some nice toys here. - Roy Batty -- http://www.g0704.com - http://www.bf20.com - http://www.g0602.com
-
04-06-2013, 04:04 AM #9
Community Moderator
- Join Date
- Aug 2004
- Posts
- 115
Hahaha. I know right Hoss. But keeping it real there are some other folks that have stayed on task and built some amazing machines in much less time. Umm? YES!! You for one. You already know Im a fan of your work so thanks for looking. JR Originally Posted by hoss2006
(Note: The opinions expressed in this post are my own and are not necessarily those of CNCzone and its management)
-
04-05-2013, 07:22 AM #10
Registered
- Join Date
- Oct 2006
- Posts
- 210
The heat sinks are awesome. I have seen those on the stumpy-looking servos on knee mills in the past. Neat. Someone should bring those back. Super cool.
That is going to be one nice looking machine. The color is perfect, and it looks like you got a high quality version. I can't wait to see it finished.
-
04-05-2013, 08:08 AM #11
 Member
- Join Date
- Sep 2005
- Posts
- 1195
Do you plan to use ESS and VFD using basic board?A simple parallel cable (printer cable) and a basic breakout board can control ANY 3 axis machine.
-
04-05-2013, 08:59 AM #12
Registered
- Join Date
- Dec 2006
- Posts
- 839
Those Pittman motors are way more powerful than one would expect, they would run the mill fine. Its a shame we lost Aaron as the owner of IH, IMHO the people lost a lot of what Aaron was trying to do for them when IH was sold. Its my understanding the company has again been sold, hopefully they will bring the company back to a level more in line with what it was when Aaron was running it.
I have this exact mill, mine was built in 2001 (same color also). I have been pleased with mine all though a little trouble with the Z axis. The motor on mine has held up great, in fact I feel like it may be a little better than most Asian motors that come with many of the mills these days. Both power and durability have been very good with it. On the Z axis the dovetails have spread a bit at the bottom of the travel ( casting seasoning maybe?). Its not bad, but something has moved in the casting to cause it and it gets tight at the bottom of the travel.
One problem I did have was every bearing in the head that was above the oil line died with in hours of breaking in. They had drawn moisture and rusted. Mine set in storage for many years also so this may have been the reason.
I think the Y axis nut mount will be different than the mount supplied by Aaron, and maybe even the X axis. The Z axis mod Aaron outlined to fix slop in the will need to be dune the same as the IH mill (maybe some small differences).
Also every gib in the machine may really need help. They looked like you took a grinder to them on mine, but after making them flat/fit the machine worked so much better. Movement, accuracy and slop where all improved a great deal and the machine has shown no signs of wear in a few years of use. No lapping/scraping on the dovetails, just the work done on the gibs.
Over all I feel these are good castings/machines to start with. Maybe no better than others, but certainly no worse. BTW be careful when moving the head around, they use filler to smooth the sides of the head before painting. It will chip and come out in chucks if you let something dig into it. The paint has held up very good on mine (where I didn't crack the filler) so if you can keep from chipping when doing the CNC mods it will be worth being careful with the painted surfaces.
IDK if your going to go with ball screws, if not the factory nuts and end mounts are possibly the worst part of this machine. New nuts and end bearings would fix this, but with Aarons kit you will at least have the end bearings covered. The factory nuts do have backlash adjustment, but it leaves it to stiff for hand cranks, but may work ok with the servos. Ball screws would be best.
JessGOD Bless, and prayers for all.
-
04-05-2013, 10:29 PM #13
Registered
- Join Date
- Jan 2012
- Posts
- 0
Hey Jess, you don't happen to still have your factory leadscrews and nuts do you? You aren't kidding about the factory nuts being bad, my x-axis is completely gone, and the y isn't feeling good anymore either.
JR is going to see if he still has his, but I wouldn't mind ending up with 2 sets if it comes to that. I'm still not convinced I want to CNC my mill...
BTW, I would have PMed this message, but your inbox is full Chasing tenths is hard...
-
04-06-2013, 05:40 AM #14
Community Moderator
- Join Date
- Aug 2004
- Posts
- 115
Hey Jess. I don't normally "quote" an entire post but I couldn't find a place to cut your reply. I agree 100% Originally Posted by LUCKY13
I bought one of Aaron's first RF-45 kits (full three axis, servo, ballscrew encoder unit). I talked with him for hours on end. We have similar backgrounds. I enjoyed our convos till he sold the shop and went to work for TCI. Did the BIG move. Yup, Moss TCI Haha. Never woulda known it. Dude was down to Earth. JR(Note: The opinions expressed in this post are my own and are not necessarily those of CNCzone and its management)
-
07-05-2013, 08:19 AM #15
Community Moderator
- Join Date
- Aug 2004
- Posts
- 115
Photobucket ERRR!
") JR
(Note: The opinions expressed in this post are my own and are not necessarily those of CNCzone and its management)
JR
(Note: The opinions expressed in this post are my own and are not necessarily those of CNCzone and its management)
-
07-05-2013, 10:02 AM #16
Registered
- Join Date
- Nov 2007
- Posts
- 980
Forgive me but why can't you just upload them here directly as it's free to do? Originally Posted by JRouche
DaveDave->..
-
07-03-2013, 06:23 AM #17
Community Moderator
- Join Date
- Aug 2004
- Posts
- 115
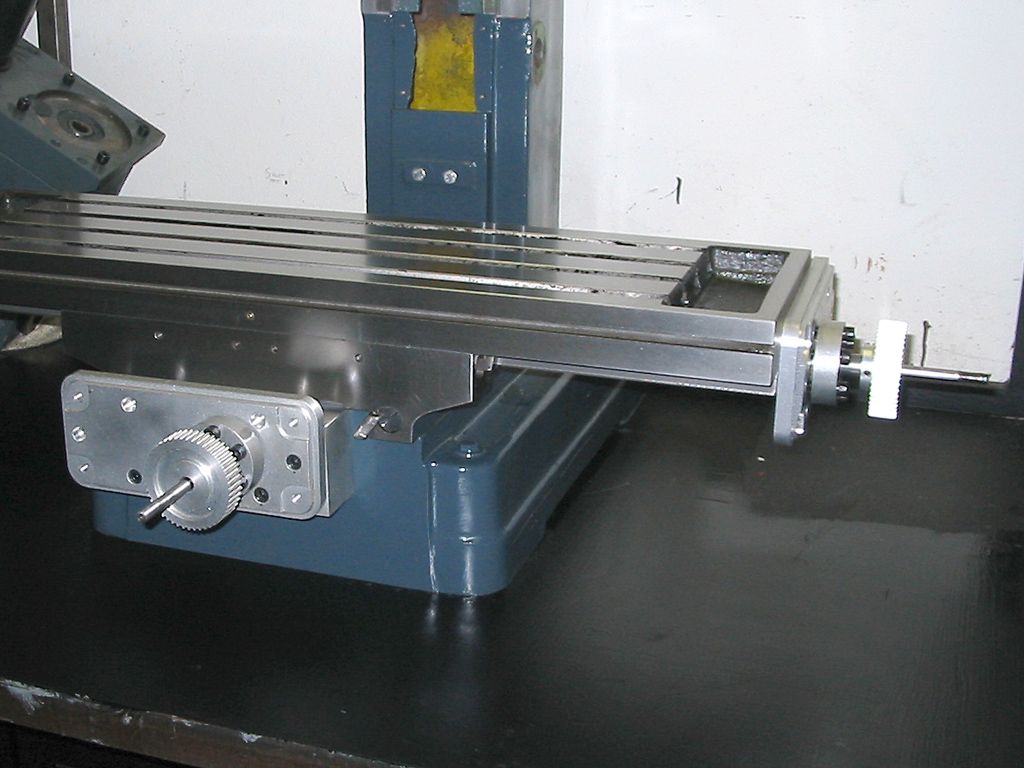
More pics. The table on after the ball screw nuts and screws were mounted. One part I didnt talk about was the ball nuts were wrapped in heat shrink tubing to help keep "junk" out of them. I wish I would have made provisions for oiling of the nuts/screws. I have a feeling the entire assembly will be apart again to plumb some lines to them. Live and learn, I hope
Table back on.
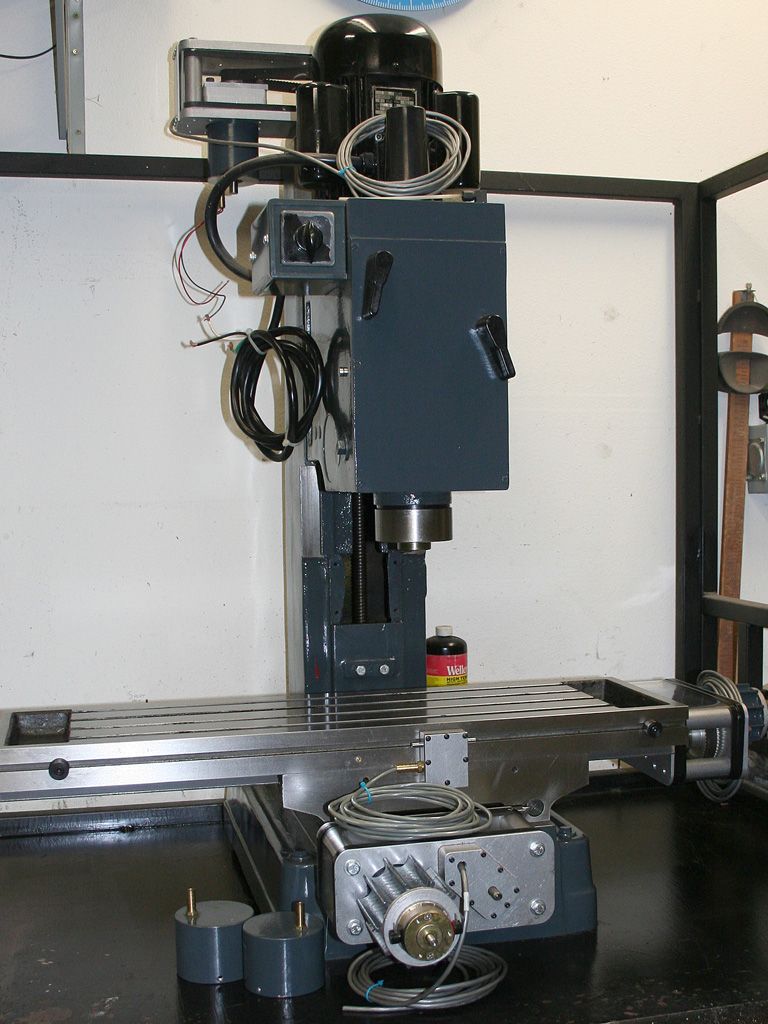
So YES! handlewanker This is the final look of the machine as of this month. Finally right LOL I have done some work that is current and will sort out those pics. It was a chore to find all the old pics and figure out what to write. Its kinda a drag to post old pics and try and think of something to say. But now that it is current work I can just lay into it and bore the hell out of you guys with my tendancey to run on with talk
As she sits today.. More to follow but prolly not any faster due to the snails pace at which I travel with my projects. I will try to keep it worth reading though. Really sorry for the old stuff I posted but to make it a story I thought I should show how it evolved to the point where it is now. It had a beginning and the story should start at the beginning. Bear with me folks
Sitting after six years of neglect. She will get some life giving electrical energy within the year I hope. Ok, thats a lil far fetched optimism JR

 (Note: The opinions expressed in this post are my own and are not necessarily those of CNCzone and its management)
-
04-06-2013, 05:14 AM #18
Community Moderator
- Join Date
- Aug 2004
- Posts
- 115
Hi asuratman. I do intend to use an A/C drive (VFD) on my mill. Id rather use a D/C motor but the cost is out of my range. And besides that I seemed to have accumulated three nice A/C drives that should work very nicely with this mill. Originally Posted by asuratman
I wont be using a basic breakout board. I can see the confusion I set up talking about how they can be used. Im using a PMDX board that is far from basic. Its a nice board.
WAIT a second! My bust!! You prolly asked the perfect question. And to answer it would be YES.
I misinterpreted your question. The ESS is a three port board and the PMDX is a two port board. So yes Sir. I will use a basic board for the third port off the ESS to control the VFD. Im solly to have missed your point.
Lemme talk about the boards. And Im no expert, just thinking. The ESS is a computer for the most part. It allows the software (Mach) to dole out commands freely without the overhead. It can spit out step and direction sigs as fast as it wants (which is pretty darn fast even with a slow computer) without worrying about the timing. The ESS board takes the dump from Mach and processes it timing wise so Mach doesnt have to drip feed. Then Mach can send sigs for other events as it sits idle.
IMO its a very strong board and the USB version was getting there but with the Ethernet board it takes the troubles of the USB path out of the mix. USB is still a master computer hog. Where Ethernet is not. Ethernet will send a stream of data to the ESS board and branch it off into three ports. Its a slave computer in a way.
The PMDX is very ESS complient. They actually have three mounting holes on the board so the ESS can be firmly mounted to it with standoffs. I will use 1" standoffs. Two header cables will fit right under the ESS and plug right into the PMDX.
So NOW!! My short sightedness. You asked about the VFD and a basic breakout board. You are correct. There is a third port off the ESS that could be used for a MPG (manual pulse generator) or to control a VFD.
So to answer your question, YES. I will include a "basic" board to break out the third port from the ESS to drive "other" activities which may include a VFD or a beer pouring machine Its still in the air which one is more important but with three ports I have enough to go around.
Thank you Sir for getting involved in the build. Good to hear from folks out of the US. Love the input. JR
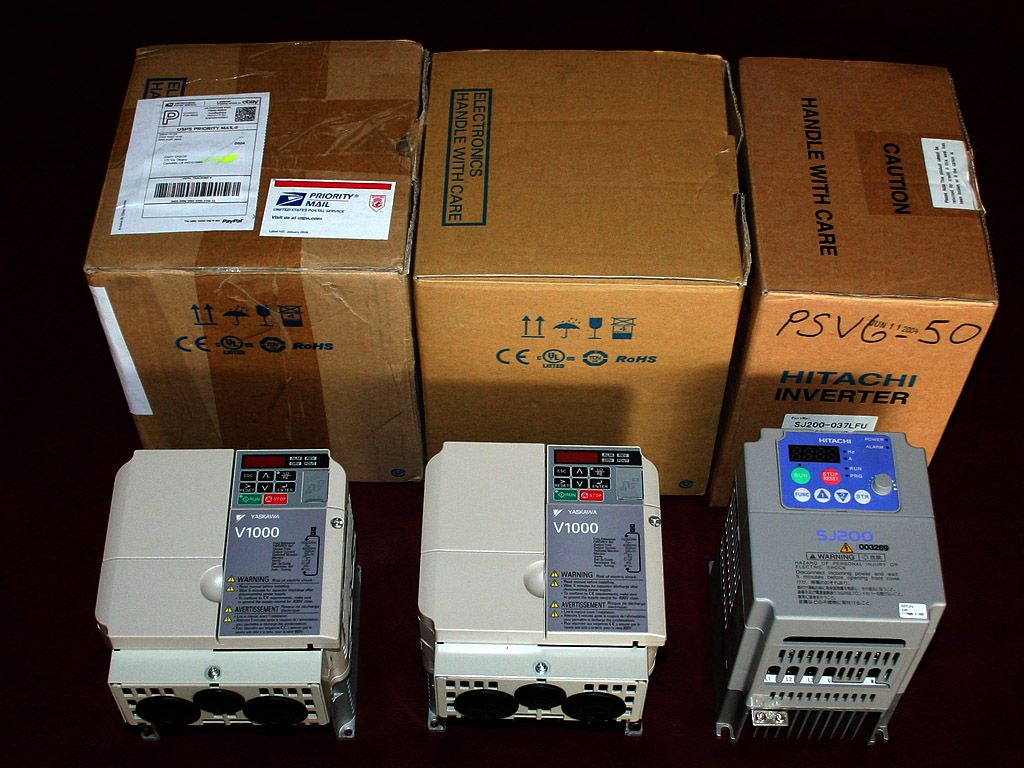
OH!! The VFDs or A/C drives I found in my garage.
Nice units even though they are old. They are new in box units. 5hp (3.7kW boxes). Two Yaskawa V1000 drives and one Hitachi SJ200. Not the newest and greatest but doable for a 2hp three phase spindle motor I'm hoping. Still would like to go with D/C though
 (Note: The opinions expressed in this post are my own and are not necessarily those of CNCzone and its management)
-
04-06-2013, 05:14 AM #19
Registered
- Join Date
- Dec 2006
- Posts
- 839
1HobbyMachinist
I do still have them, but I plan to use them on a project where I just need screws that will work and there accuracy and smoothness will not really matter.
Have you tried to adjust the backlash adjuster on them? They are easy to adjust, it just takes a Allen wrench . I have seen the Y axis nut just simply get loose where it only uses one bolt. But even adjusted up good they don't work very well. On my X axis though I was able to get good performance from them once my gib was fitted to the dovetails better, and I had the end bearing slack taken care of. The handwheels are also such a joke I took the handle off and drilled the end of it so that two small bearings would fit in the end of it. This made it so when I turned the handle on the handwheel the handle was really running on bearings. IDK if that makes any sense to you, if you need I could post a pic of it with my phone.
IMHO if you are going to try and still run the factory screws I would make some new nuts for them. I would also build a mount for the nut to bolt to instead of the nut itself bolting down. If you have not seen it done I can find a link to show how to make some nice ones out of Delrin or even Teflon. You basically melt the Delrin nut to the screw and it forms the best looking threads you could have. Plus it about always will have very low backlash. It would be pretty easy to do as long as you have a boring head for your mill, or a lathe.
You would build the nut mount just like one for a flange type ball nut, then the nut would look like a flanged ball nut also so that you could bolt it to the mount with its flange. You make the hole for the threads a little small just like you was going to thread it. But then you slice it in half, put it around the screw, then take a hair blow drier to melt it to the screw. It even welds itself back into one piece, you would just back the screw out and then bolt it into the new mount and you have a nut that doesn't need lube, or adjusting for close to zero backlash.
Here is a link to a thread at HSM where they show making some nuts this way, all though there not adding a flange for bolting.
Making Acetal leadscrew nuts the easy way
JessGOD Bless, and prayers for all.
-
04-06-2013, 10:05 PM #20
Registered
- Join Date
- Jan 2012
- Posts
- 0
LUCKY13, I have adjusted the backlash in the past, and continue to do so. The problem is the nut for the x-axis nearly completely wore out to the point that there were hardly any threads left inside of it. I've got a lot of miles on this mill

Perhaps if you only need the screws, you'd be willing to part with the nuts? No big deal in any case, I've been getting by with doing all my machining in the y-axis lately, it's frustrating, but I'm still making chips.
I saw that thread on the acetyl nuts, and may go that route later. Right now I just need to get my mill running again so I can get some work done.
ThanksChasing tenths is hard...

 Reply With Quote


Similar Threads
-
Enco vs. Grizzly square column mill
By kc6uvm in forum Benchtop MachinesReplies: 15Last Post: 10-11-2012, 07:16 PM -
Enco RF-45 clone CNC convertion.
By LUCKY13 in forum Vertical Mill, Lathe Project LogReplies: 18Last Post: 04-26-2012, 07:54 PM -
enco 45 square column mill
By atomize in forum Benchtop MachinesReplies: 11Last Post: 10-19-2008, 09:46 AM -
Enco Square column onsale w/free shipping
By JRouche in forum Benchtop MachinesReplies: 3Last Post: 05-07-2007, 06:44 AM -
HARBOR FREIGHT small round column mill to a square column conversion.
By motomitch1 in forum Vertical Mill, Lathe Project LogReplies: 25Last Post: 12-01-2005, 05:24 PM
