


I think the wierink joints might be 4 axis routings anyways.they sure are pretty, and if you could do something similar, I'm sure you'd have a pocket full of money...
Still, I will be looking forward to see what you finally release as version 1.0.
Thread: Dovetails Anyone??
Results 61 to 80 of 120
-
01-15-2013, 09:15 PM #61
 Registered
- Join Date
- Nov 2012
- Posts
- 18
-
01-16-2013, 12:14 AM #62
Registered
- Join Date
- Oct 2008
- Posts
- 8
I see nothing in the joint that would require a 4th axis. Originally Posted by notimeforwork

Bob Willson
-
01-16-2013, 11:31 AM #63
Registered
- Join Date
- Nov 2012
- Posts
- 18
Looking at it more closely - you are right, there isn't a need for fourth axis.
-
03-01-2013, 09:56 PM #64
Registered
- Join Date
- Apr 2007
- Posts
- 663
jig for cutting box joints vertically
Found this idea, might have application to Ger's endeavors
EL34's CNC P5
-
01-19-2014, 03:59 PM #65
Community Moderator
- Join Date
- Mar 2003
- Posts
- 35538
Still Plugging Away..............................
For anyone interested, I'm still working on this, and making pretty good progress.
I've re-written a lot of the code 2 or 3 times, to both simplify it and add more features.
Right now, I can do just about any type of half blind dovetails anyone could want. Or I will by the end of the week. I spent all day yesterday getting the code seen in the screen shots.
It'll also output both Mach3 g-code and ShopBot code.
The bad thing, though, is that all these dovetail options add a lot of complexity, which takes a lot of time. It may take 6 months to a year before I get it finished. Although I do expect it to go quicker once the full dovetails are finished
The sample in the pic is off a little due to my test fixture not being in the right position on my machine.Gerry
UCCNC 2017 Screenset
http://www.thecncwoodworker.com/2017.html
Mach3 2010 Screenset
http://www.thecncwoodworker.com/2010.html
JointCAM - CNC Dovetails & Box Joints
http://www.g-forcecnc.com/jointcam.html
(Note: The opinions expressed in this post are my own and are not necessarily those of CNCzone and its management)
-
01-21-2014, 12:59 AM #66
Registered
- Join Date
- Jan 2006
- Posts
- 357
Looks Good Gerry!!
-
01-21-2014, 03:23 AM #67
Registered
- Join Date
- May 2010
- Posts
- 44
Impressive
Sent from my Vodafone 875 using Tapatalk
-
03-22-2014, 08:12 PM #68
Registered
- Join Date
- Nov 2012
- Posts
- 18
Re: Dovetails Anyone??
Any further update on this project? It looks very promising at the point of the last post.
Sent from my HTC EVO 3D X515a using Tapatalk
-
03-22-2014, 08:38 PM #69
Community Moderator
- Join Date
- Mar 2003
- Posts
- 35538
Re: Dovetails Anyone??
Half blind dovetails are finished, and I'm currently working on full through dovetails.
Gerry
UCCNC 2017 Screenset
http://www.thecncwoodworker.com/2017.html
Mach3 2010 Screenset
http://www.thecncwoodworker.com/2010.html
JointCAM - CNC Dovetails & Box Joints
http://www.g-forcecnc.com/jointcam.html
(Note: The opinions expressed in this post are my own and are not necessarily those of CNCzone and its management)
-
04-15-2014, 01:12 AM #70
Registered
- Join Date
- Jun 2012
- Posts
- 393
Re: Dovetails Anyone??
I am ready to buy depending on price.
The time has come the woodworker said to speak of many things. 0f routers and Wood , chips and paints and stains and CNC and other things.
-
04-17-2014, 02:56 AM #71
Registered
- Join Date
- Feb 2012
- Posts
- 90
Re: Dovetails Anyone??
Same here. I did these cuts programming the code by hand but it sure would be nice not to have to do that again. Just finished up a new dovetail fixture today so I'm ready to roll. Originally Posted by Gallchobhair
-
04-17-2014, 11:24 AM #72
Member
- Join Date
- Apr 2007
- Posts
- 8082
Re: Dovetails Anyone??
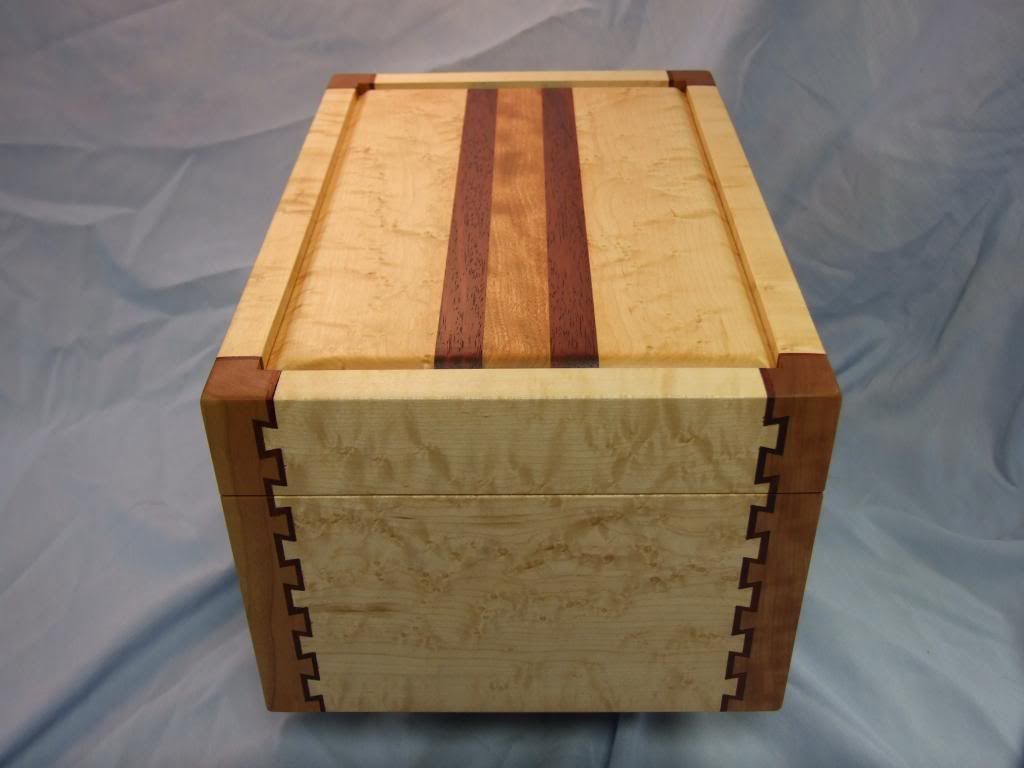
That's a seriously nice looking joint, having three different color woods like that.
 CarveOne
http://www.carveonecncwoodcraft.com
-
04-17-2014, 01:54 PM #73
Gold Member
- Join Date
- Dec 2004
- Posts
- 1865
Re: Dovetails Anyone??
Awesome work.
I can't wait to retire so I can busier at home than I am at work.
MikeWarning: DIY CNC may cause extreme hair loss due to you pulling your hair out.
-
04-17-2014, 03:36 PM #74
Registered
- Join Date
- Feb 2012
- Posts
- 90
Re: Dovetails Anyone??
Thanks guys... The joints are based on ones from incra and looking forward to trying some different things now that I've got the cnc dialed in a little better. It has been a lot of learning.... and starting over... but lurking on here has taught me a lot and it is amazing how many times I read something and said "now that makes sense" and the name next to it was ger21.
-
04-17-2014, 04:56 PM #75
Community Moderator
- Join Date
- Mar 2003
- Posts
- 35538
Re: Dovetails Anyone??
Sorry to say that my software won't do those joints easily. Or at least not automatically. You'd probably need to either do a CAD drawing to get dimensions, or do some trig.
The main issue is that I specify pin and tail widths, and the software varies the spacing to accommodate this. A joint like that requires a constant spacing (center to center distance) for each of the different woods, but at different depths.
If you have a CAD drawing, you can just enter the numbers from the drawing, and it should be pretty easy. But there's nothing built in to automate a joint like this.
It still should be a lot faster than an Incra jig, or hand coding, though.
I've been working on the code for through dovetails for the last week or two, and there's a lot of trig involved, but I have it mostly figured out. It'll still be another 2-4 weeks of coding to get all the dovetail work done, though.Gerry
UCCNC 2017 Screenset
http://www.thecncwoodworker.com/2017.html
Mach3 2010 Screenset
http://www.thecncwoodworker.com/2010.html
JointCAM - CNC Dovetails & Box Joints
http://www.g-forcecnc.com/jointcam.html
(Note: The opinions expressed in this post are my own and are not necessarily those of CNCzone and its management)
-
04-17-2014, 08:04 PM #76
Registered
- Join Date
- Feb 2012
- Posts
- 90
Re: Dovetails Anyone??
Pretty much there is nothing easy about those joints
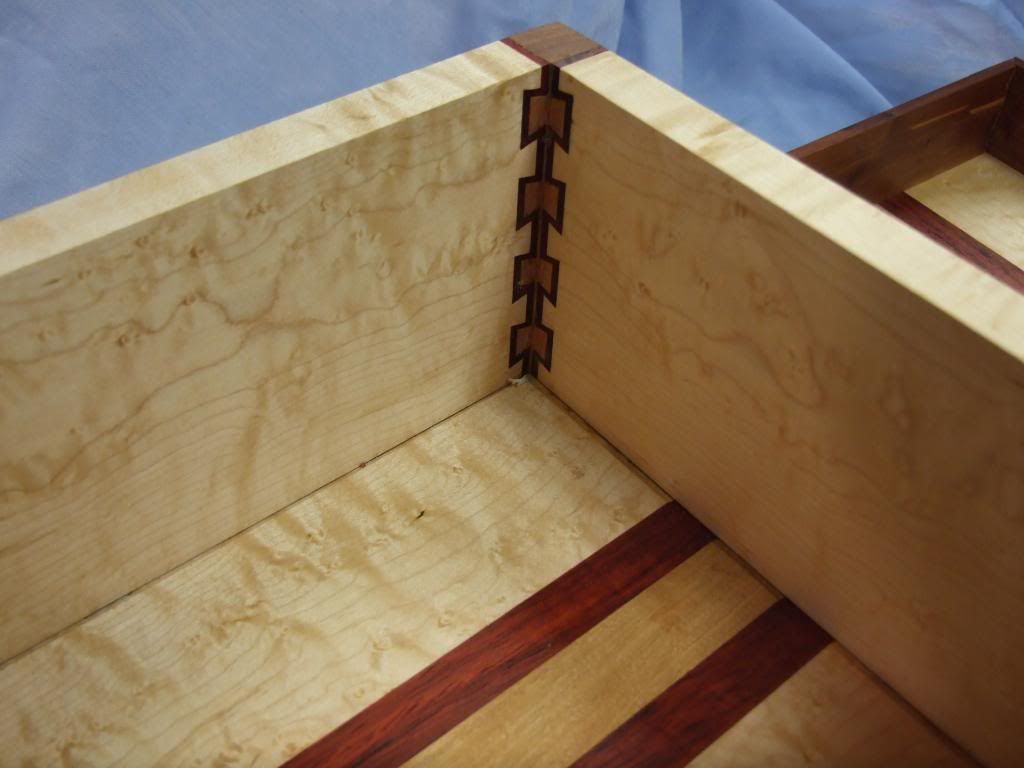
 However, they are all cut at the same depth but in a multi-step process. I used corel to lay them out and stared the programming with sheetcam but had to do some hand coding so that it wouldn't lift at the end of the cut, etc. The maple is cut first, then the next layer is cut (extra thick) and glued in. That "ribbon" piece is cut as dovetail slots and then you trim off what you need. Once glued it is cut 3/32" deep to match what the inner dovetail will be and routed. The corner blocks are then routed as separate pieces and the inside corner is trimmed out so the joints show on the inside of the box. The joint showing on the inside is my deviation on the incra design. There would still need to be some hand programming to do these but I'm getting ready to do a bunch of standard half-blind drawers for our house and your software would be just the ticket. It still looks like your software would help out a lot on cutting the incra joints but it wouldn't be something straight forward to do nor would I ever expect it to do that.... my head hurts enough trying to make them let alone try and program for all the steps.... especially leaving the extra 1/8" between one of the joints for the saw kerf when I cut it apart.
-
04-17-2014, 08:24 PM #77
Registered
- Join Date
- Dec 2012
- Posts
- 38
Re: Dovetails Anyone??
Gerry, Originally Posted by ger21
Do you have any pics of cutting the pins and tails and specifically how you have the pieces secured for the cuts?If it weren't for the last minute nothing would ever get done.
Jim
-
04-17-2014, 08:36 PM #78
Community Moderator
- Join Date
- Mar 2003
- Posts
- 35538
Re: Dovetails Anyone??
There's a You Tube video in post #39 showing how the half blind dovetails are cut.
My machine can't actually hold vertical pieces, so I made a fixture to cut short samples for testing.
Ideally, you want to vertical fences to locate the vertical boards. Depending on which axis you're using, one of the fences is the Zero position. You'd also want horizontal fences in line with the vertical fences. When cutting half blind sets, a spacer is required for the horizontal boards. The software tells you the spacer thickness.Gerry
UCCNC 2017 Screenset
http://www.thecncwoodworker.com/2017.html
Mach3 2010 Screenset
http://www.thecncwoodworker.com/2010.html
JointCAM - CNC Dovetails & Box Joints
http://www.g-forcecnc.com/jointcam.html
(Note: The opinions expressed in this post are my own and are not necessarily those of CNCzone and its management)
-
04-17-2014, 09:41 PM #79
Registered
- Join Date
- Dec 2012
- Posts
- 38
Re: Dovetails Anyone??
Thanks Gerry,
Either I missed the video or merely forgot that I had watched it.
I haven't started by build yet and in thinking about your dovetail program I have been contemplating incorporating an opening in the bottom similar to what Mac did in his X2S. Hmmm.If it weren't for the last minute nothing would ever get done.
Jim
-
04-22-2014, 12:37 AM #80
Community Moderator
- Join Date
- Mar 2003
- Posts
- 35538
Through Dovetails - First Test
Finally finished the code for through dovetails, and went out to do a test cut. Came out great. I think.
The scrap pine I'm using has a big cup across it's width. I clamped it to my fixture to take the bow out.
After cutting the parts, they appeared to not fit correctly, as if the spacing was slightly off. With the first tail lined up, the last one appeared to be 1/32" off. I was about to start digging through my code to check where the error was, but decided to try clamping it back onto the fixture. Once I did that, I was able to slide it together. The fit is very good.
I still need to code the opposite handed version of these, but I'm making good progress.Gerry
UCCNC 2017 Screenset
http://www.thecncwoodworker.com/2017.html
Mach3 2010 Screenset
http://www.thecncwoodworker.com/2010.html
JointCAM - CNC Dovetails & Box Joints
http://www.g-forcecnc.com/jointcam.html
(Note: The opinions expressed in this post are my own and are not necessarily those of CNCzone and its management)

 Reply With Quote

Similar Threads
-
Dovetails (Bobart)
By Gallchobhair in forum BobCad-CamReplies: 6Last Post: 04-17-2014, 06:33 AM -
Re-cutting dovetails on my X2
By sansbury in forum Benchtop MachinesReplies: 13Last Post: 03-08-2011, 01:13 AM -
Re-mill x2 dovetails?
By gopher in forum Benchtop MachinesReplies: 4Last Post: 02-20-2011, 04:29 AM -
Re cut my dovetails today!
By phantomcow2 in forum Benchtop MachinesReplies: 4Last Post: 09-29-2005, 12:35 AM
